JCRoster+ User Guide
JCRoster+ is a desktop app for managing student contacts and details, optimized for use via a Command Line Interface (CLI) while still having the benefits of a Graphical User Interface (GUI). If you can type fast, JCRoster+ can get your homeroom teacher tasks done faster than traditional GUI apps.
Note: The terms "Person" and "Student" refer to the same entity and are used interchangeably in both theis guide and the app.
Quick start
Ensure you have Java
17or above installed in your Computer.
Mac users: Ensure you have the precise JDK version prescribed here.Download the latest
.jarfile from AY2425S2-CS2103T-T15-2/tp/releases.Move the file to the folder you want to use as the home folder for JCRoster+.
Important: It is recommended to put the file in a new empty folder as the application will create a data folder in the home folder to store the data.
- Open a command terminal (powershell for windows, terminal for Mac),
cdinto the folder you put the jar file in, (Refer to Tech support for usingcdcommand) and use thejava -jar jcroster+.jarcommand to run the application.
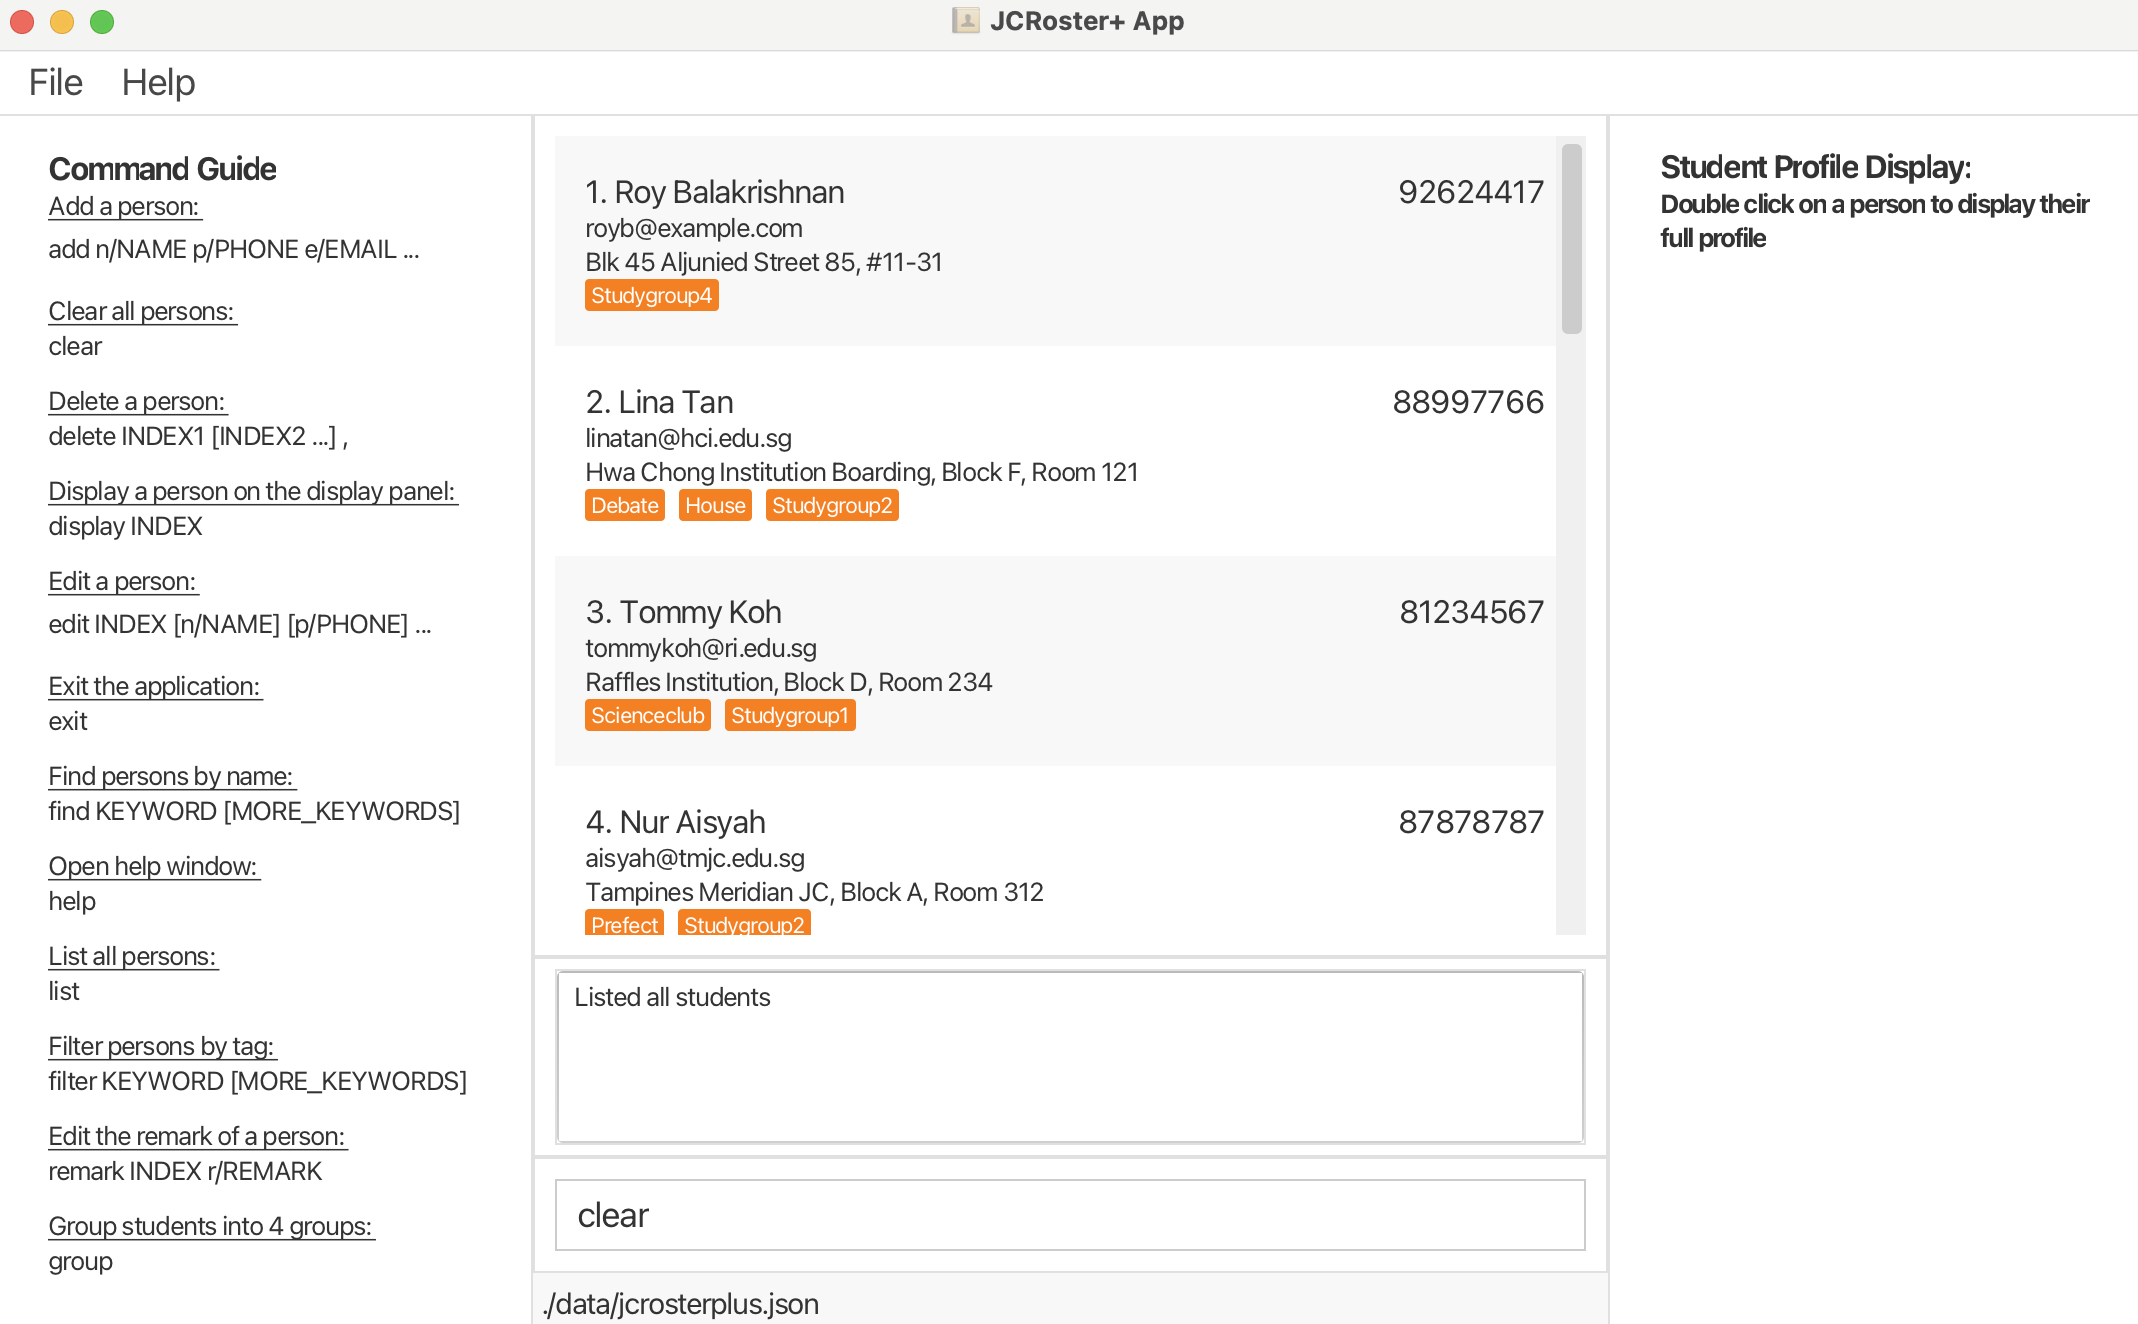
A GUI similar to the image below should appear in a few seconds. Note how the app contains some sample data.
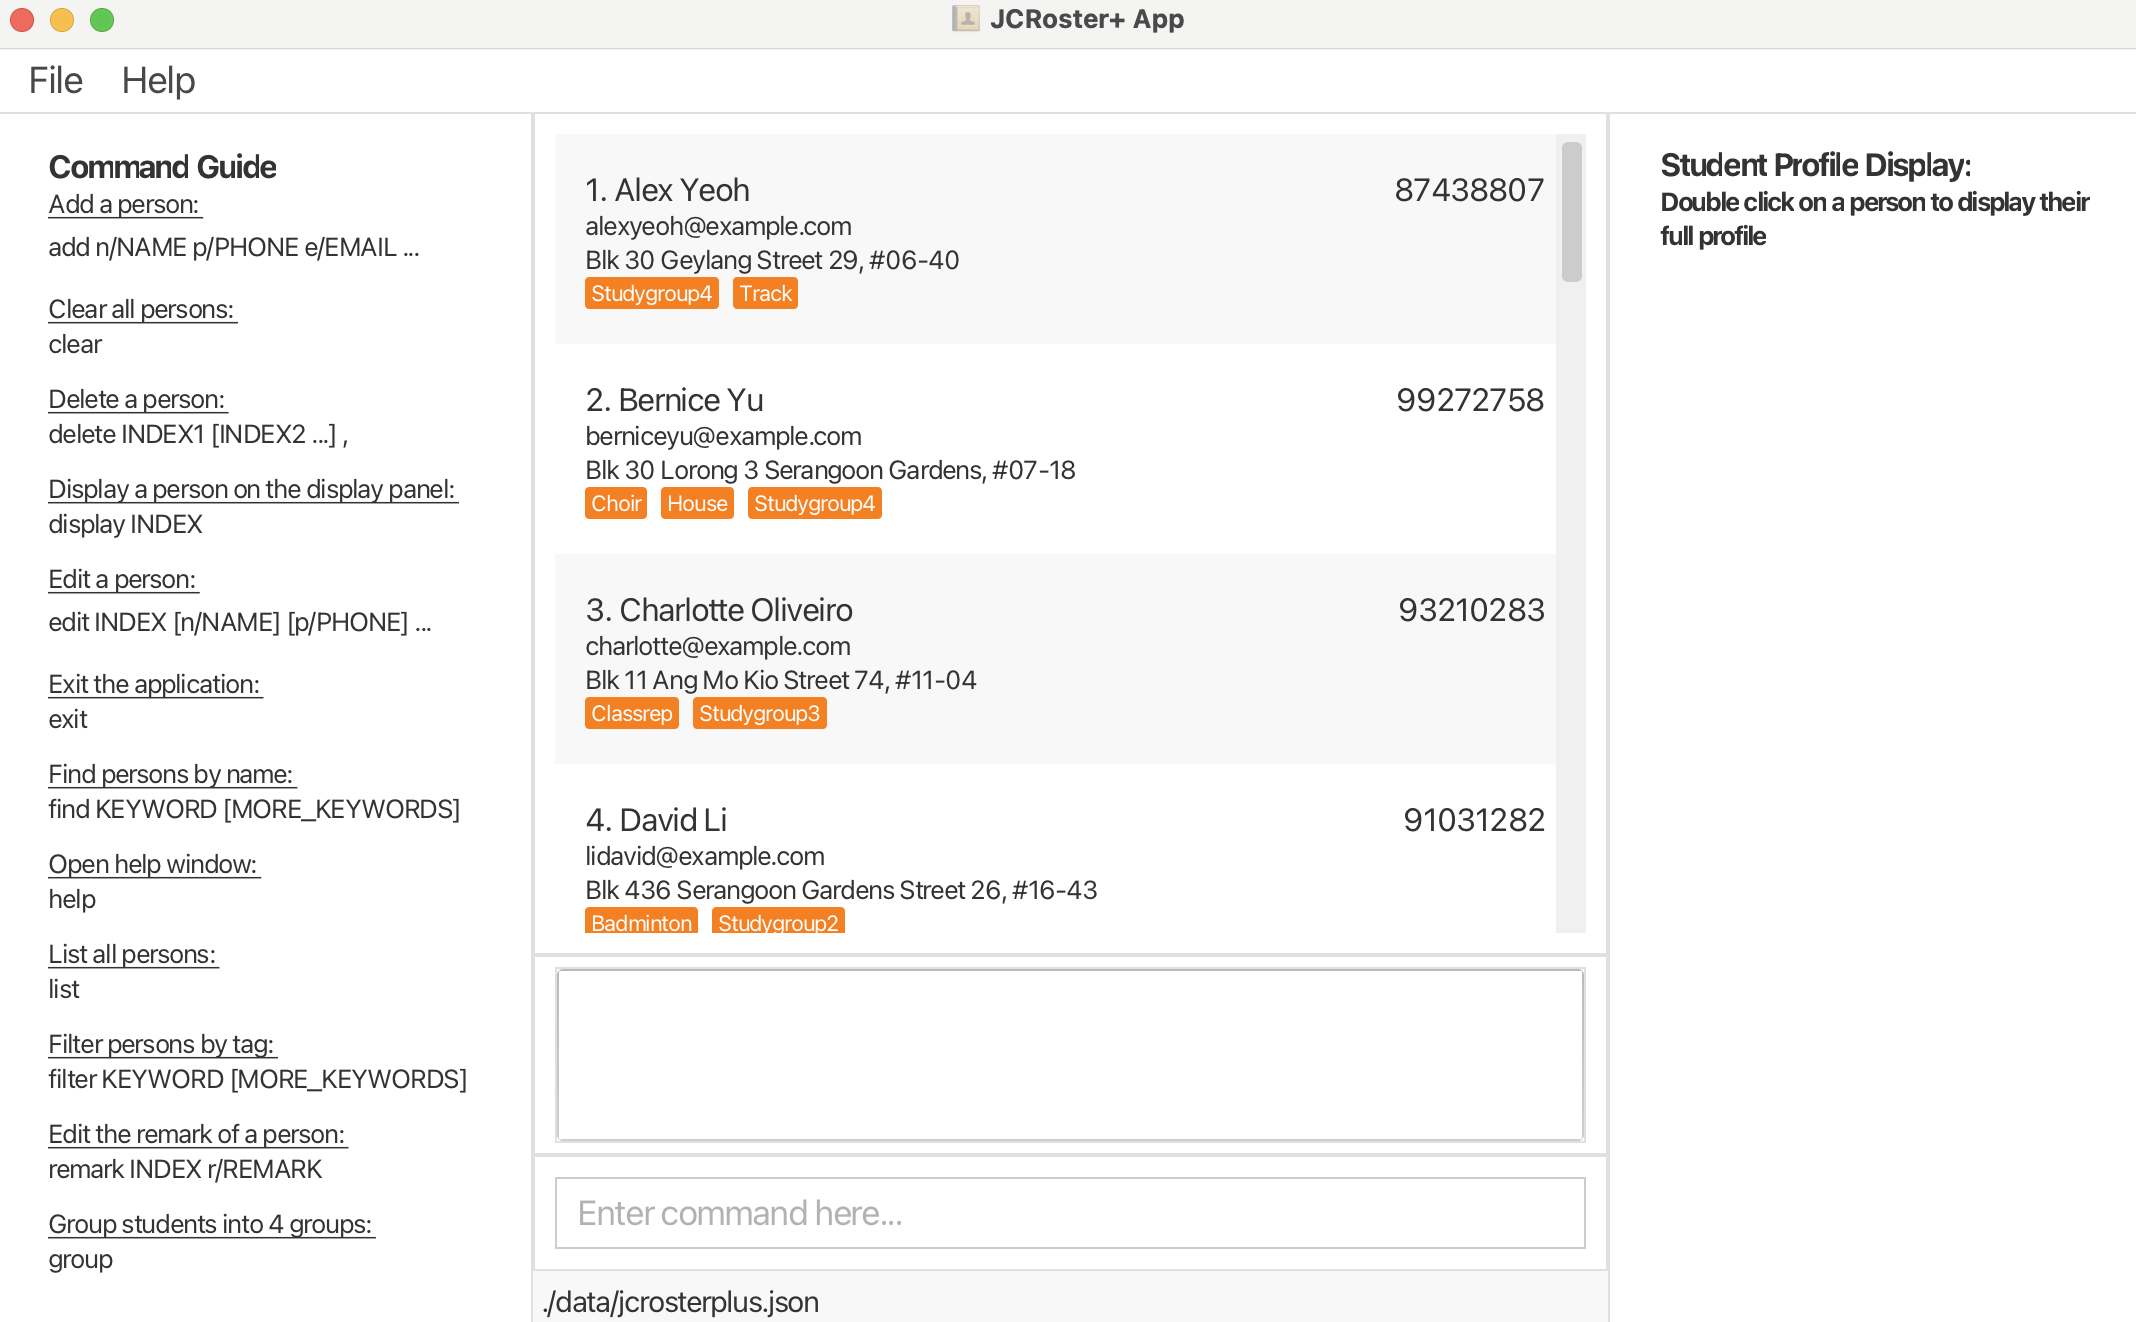
Type the command in the command box and press Enter to execute it. e.g. typing
helpand pressing Enter will open the help window. Some example commands you can try:list: Lists all students.add n/John Doe p/98765432 e/johnd@example.com a/John street block 123, #01-01 g/Maths:A, Geography:B, History:B, Economics:A, Chemistry:C, Biology:A: Adds a student namedJohn Doeto the JCRoster+.delete 3: Deletes the 3rd student shown in the current list.clear: Deletes all students.exit: Exits the app.
Refer to the Features below for details of each command.
Features
Notes about the command format:
Words in
UPPER_CASEare the parameters to be supplied by the user.
e.g. inadd n/NAME,NAMEis a parameter which can be used asadd n/John Doe.Items in square brackets are optional.
e.gn/NAME [t/TAG]can be used asn/John Doe t/friendor asn/John Doe.Items with
… after them can be used multiple times.
e.g.[t/TAG]…can be used as(i.e. 0 times),t/friend,t/friend t/familyetc.Parameters can be in any order.
e.g. if the command specifiesn/NAME p/PHONE_NUMBER,p/PHONE_NUMBER n/NAMEis also acceptable.Extraneous parameters for commands that do not take in parameters (such as
help,list,exitandclear) will be ignored.
e.g. if the command specifieshelp 123, it will be interpreted ashelp.The display list is reset to show all students after any command is run.
If you are using a PDF version of this document, be careful when copying and pasting commands that span multiple lines as space characters surrounding line-breaks may be omitted when copied over to the application.
Viewing Help : help
Displays a help link to the User Guide.
Format: help

Copy the URL and open in a browser to view the full user guide.
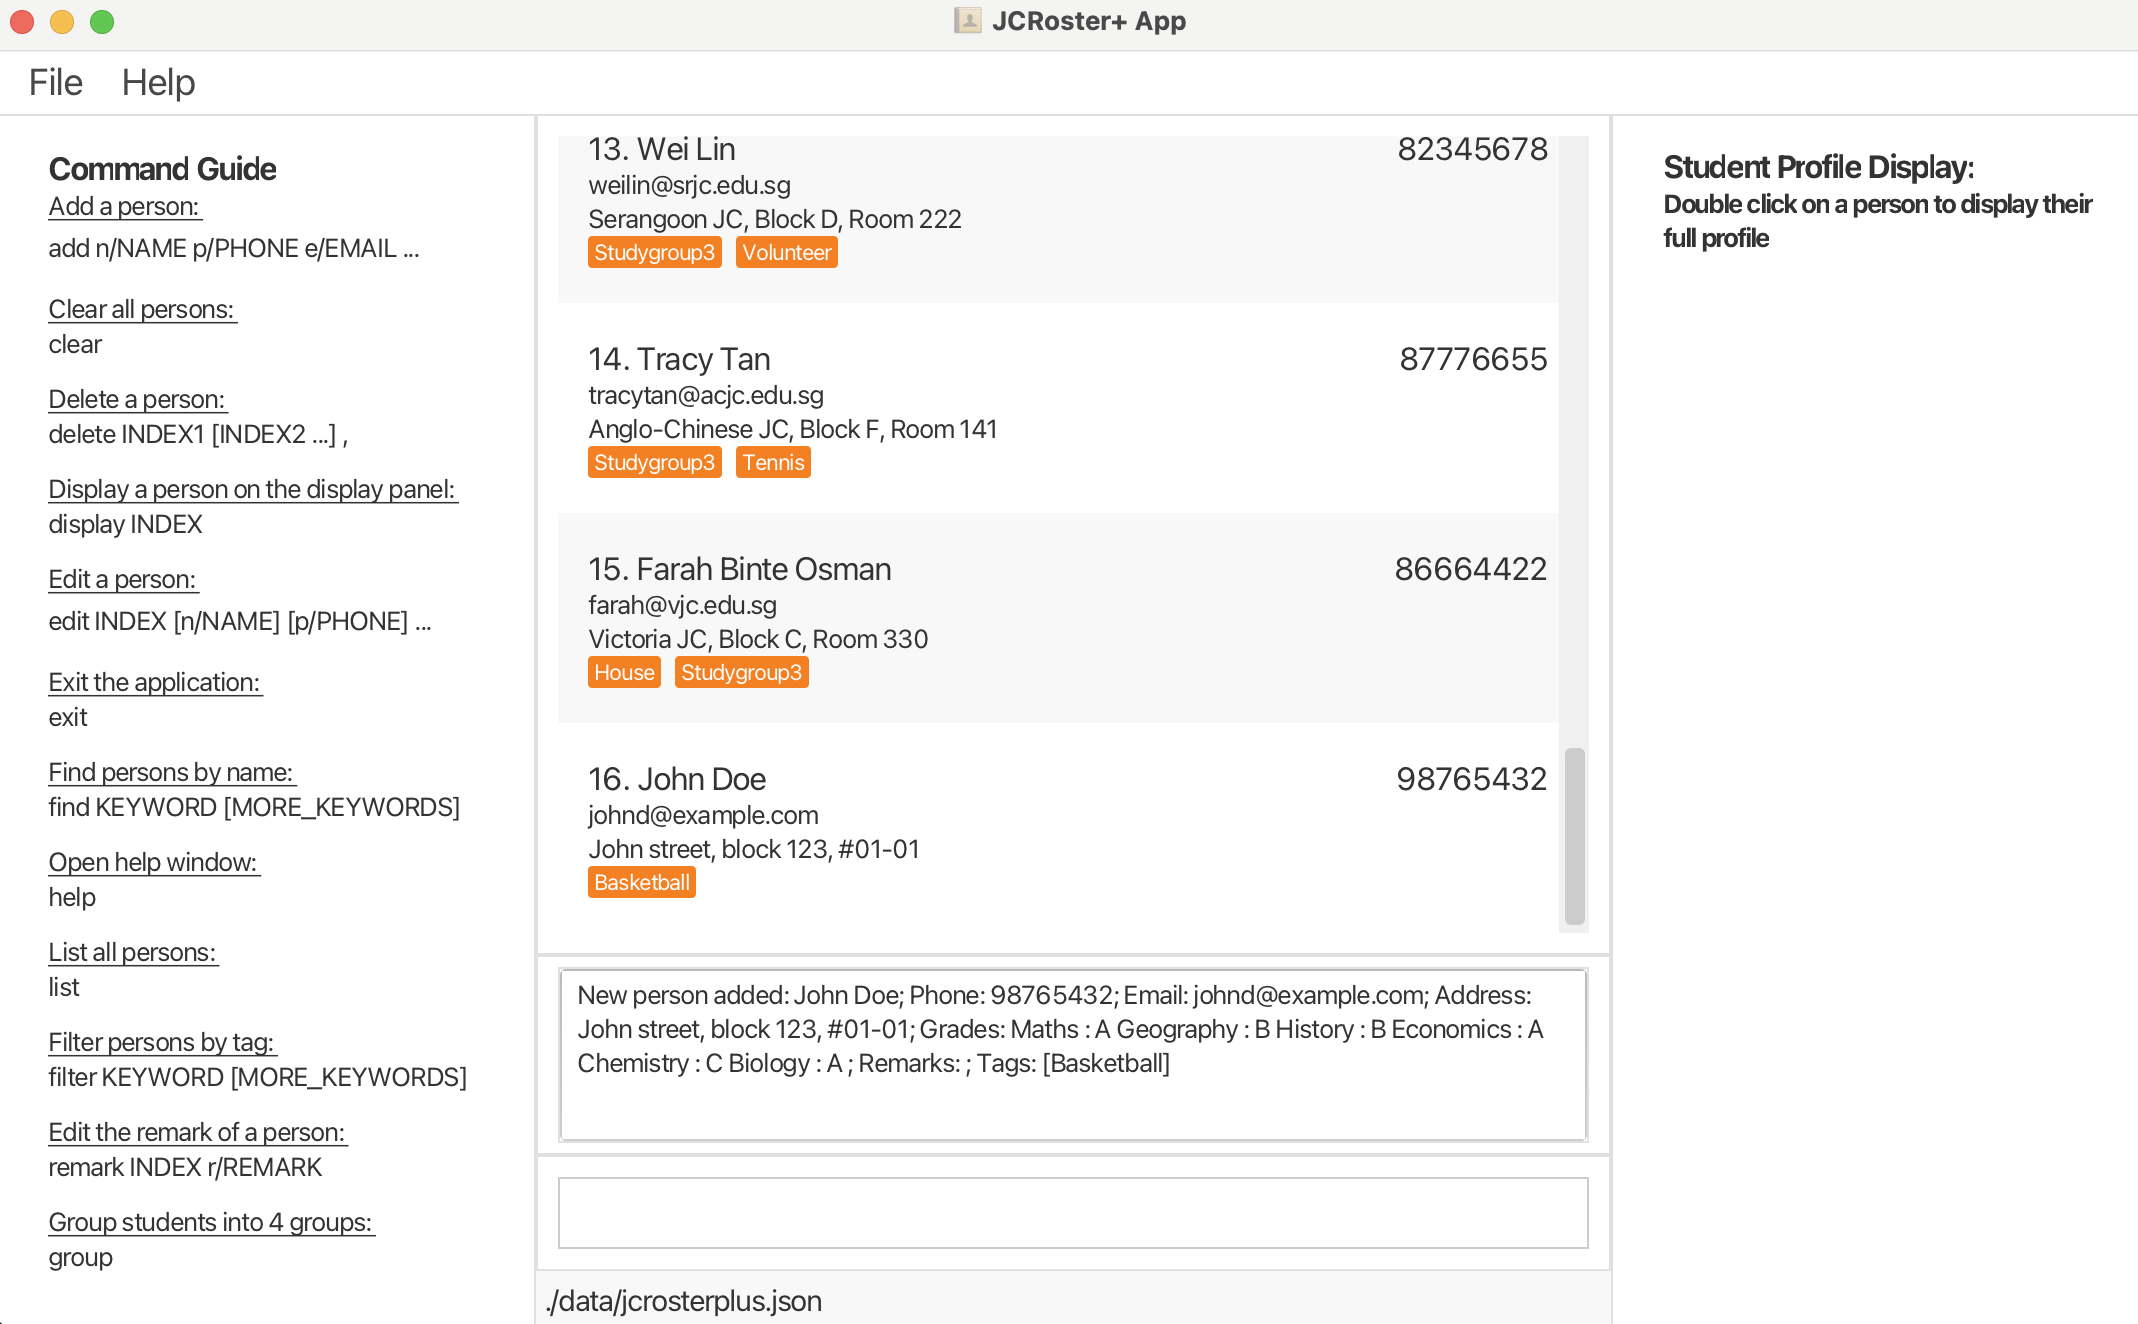
Adding a Student : add
Adds a student to JCRoster+.
Format: add n/NAME p/PHONE_NUMBER e/EMAIL a/ADDRESS g/SUBJECT1:GRADE, SUBJECT2:GRADE, SUBJECT3:GRADE, SUBJECT4:GRADE SUBJECT5:GRADE, SUBJECT6:GRADE [t/TAG]…
- Names are case-insensitive and are formatted to capitalise the first letter of the name.
- Grades can be A-F, S or U.
Tip: Tags are optional, a student can have any number of tags (including 0),
Note: Use single-word tags only, eg: t/friend and not t/friend of John Doe.
Tip: There is duplication detection for students added, if the command result shows warnings such as the one below:
Warning: It is likely that this student already exists in the JCRoster+ student list. We will add anyways, but please double check. You may want to use the edit command or delete command instead.
This means that the student you are trying to add (maybe) already exists in the JCRoster+.
Please check the list of students to see if the student you are trying to add already exists. If it does, you can use the edit command to edit the student instead of adding a new one.
Note: Student's subject can actually be set to any strings. You may want to double check the subject names you are entering. The system will not check if the subject names are valid or not.
Examples:
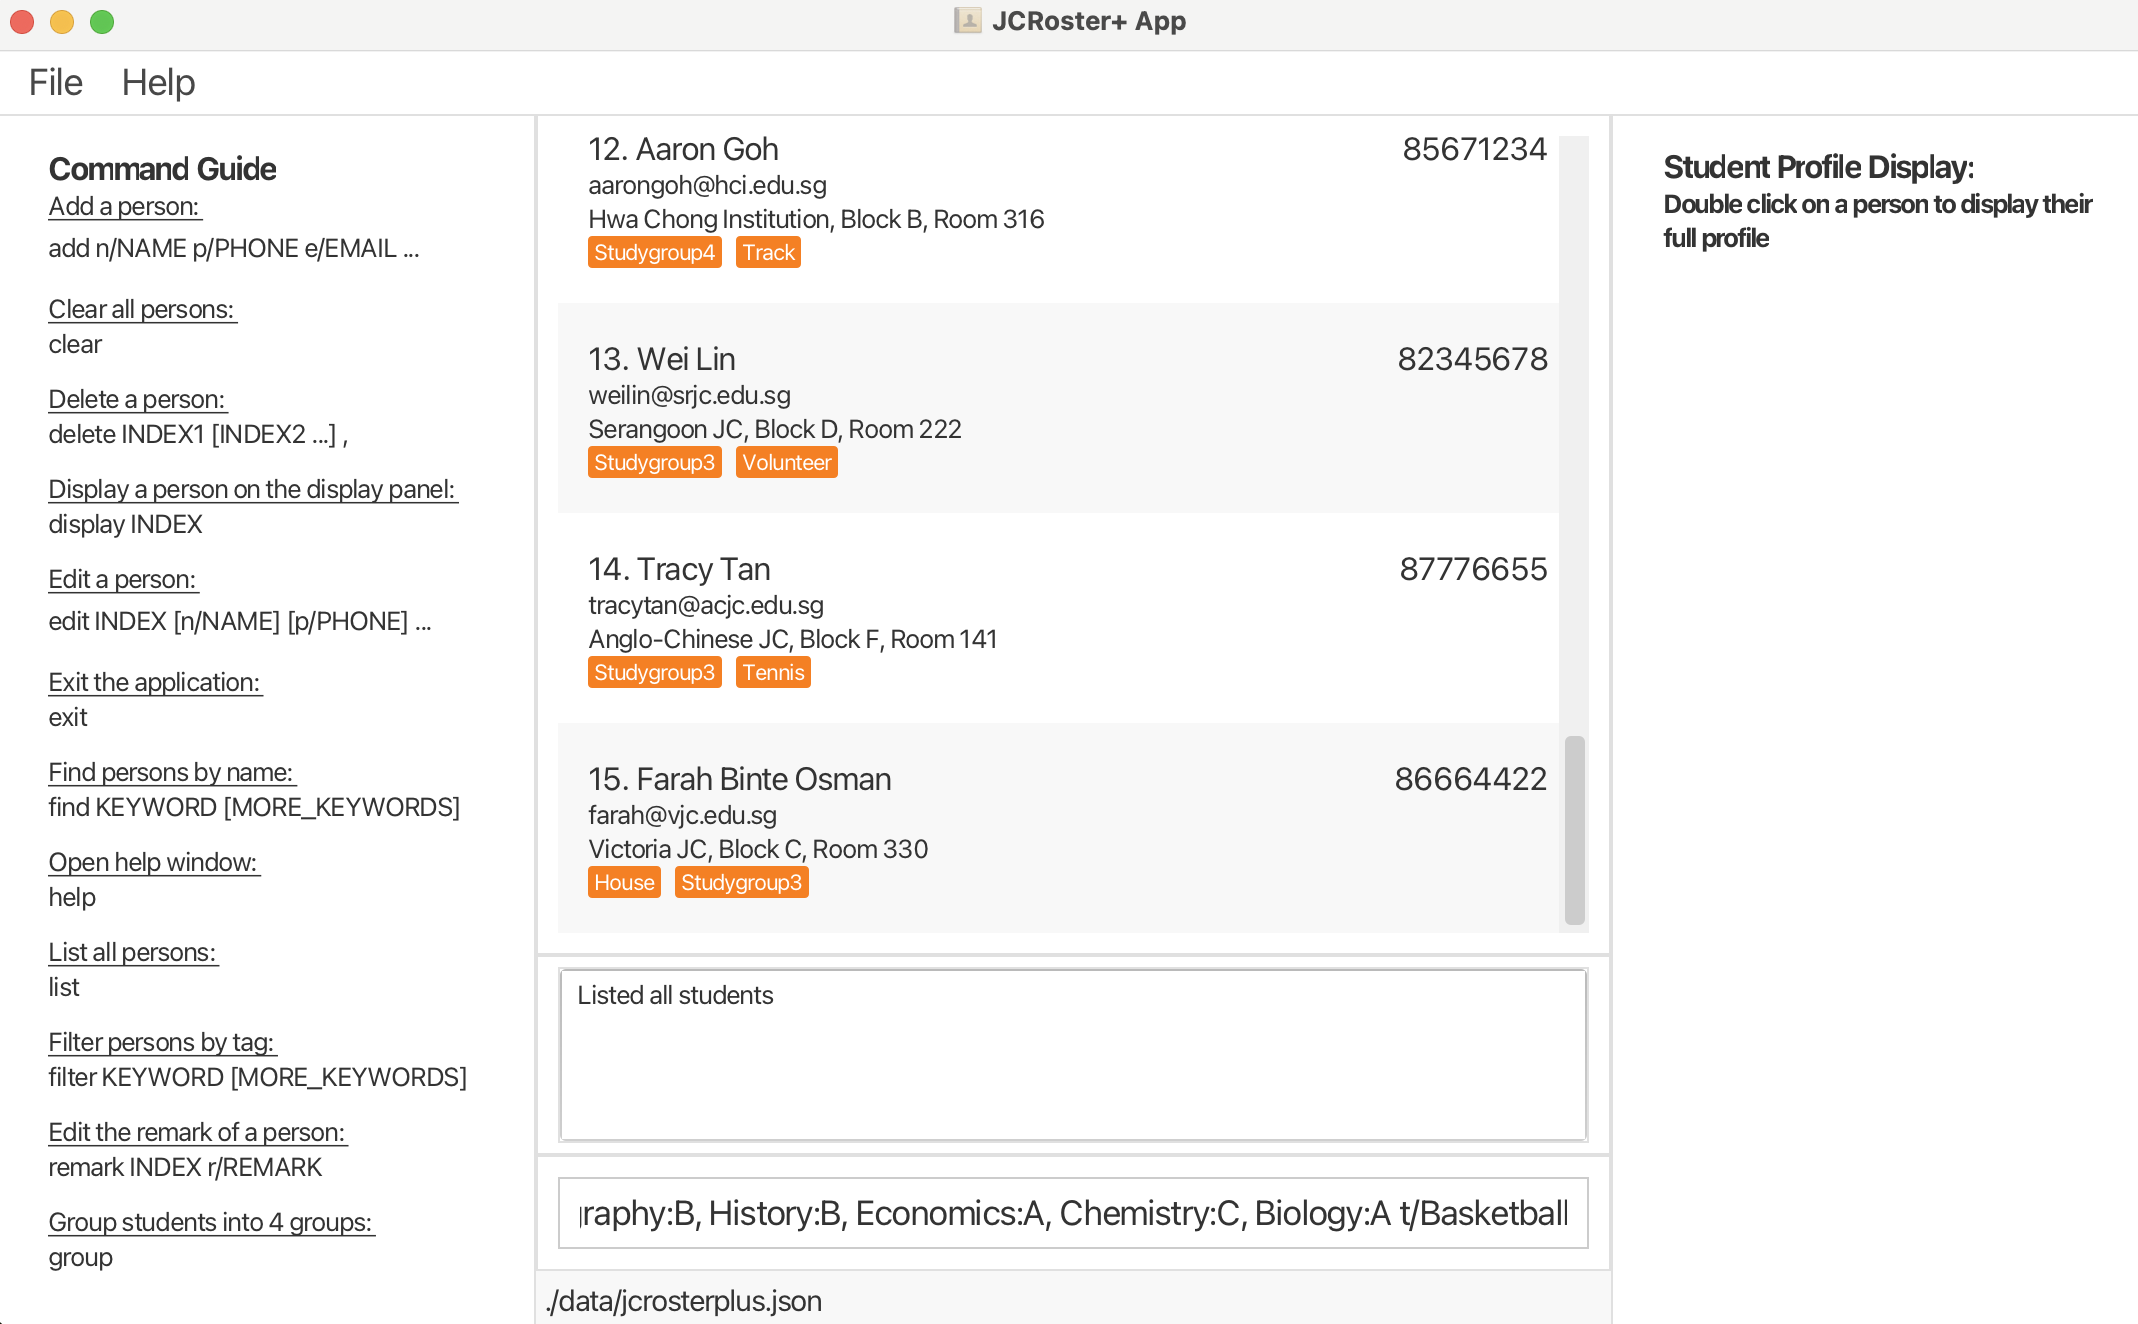
add n/John Doe p/98765432 e/johnd@example.com a/John street, block 123, #01-01 g/Maths:A, Geography:B, History:B, Economics:A, Chemistry:C, Biology:A
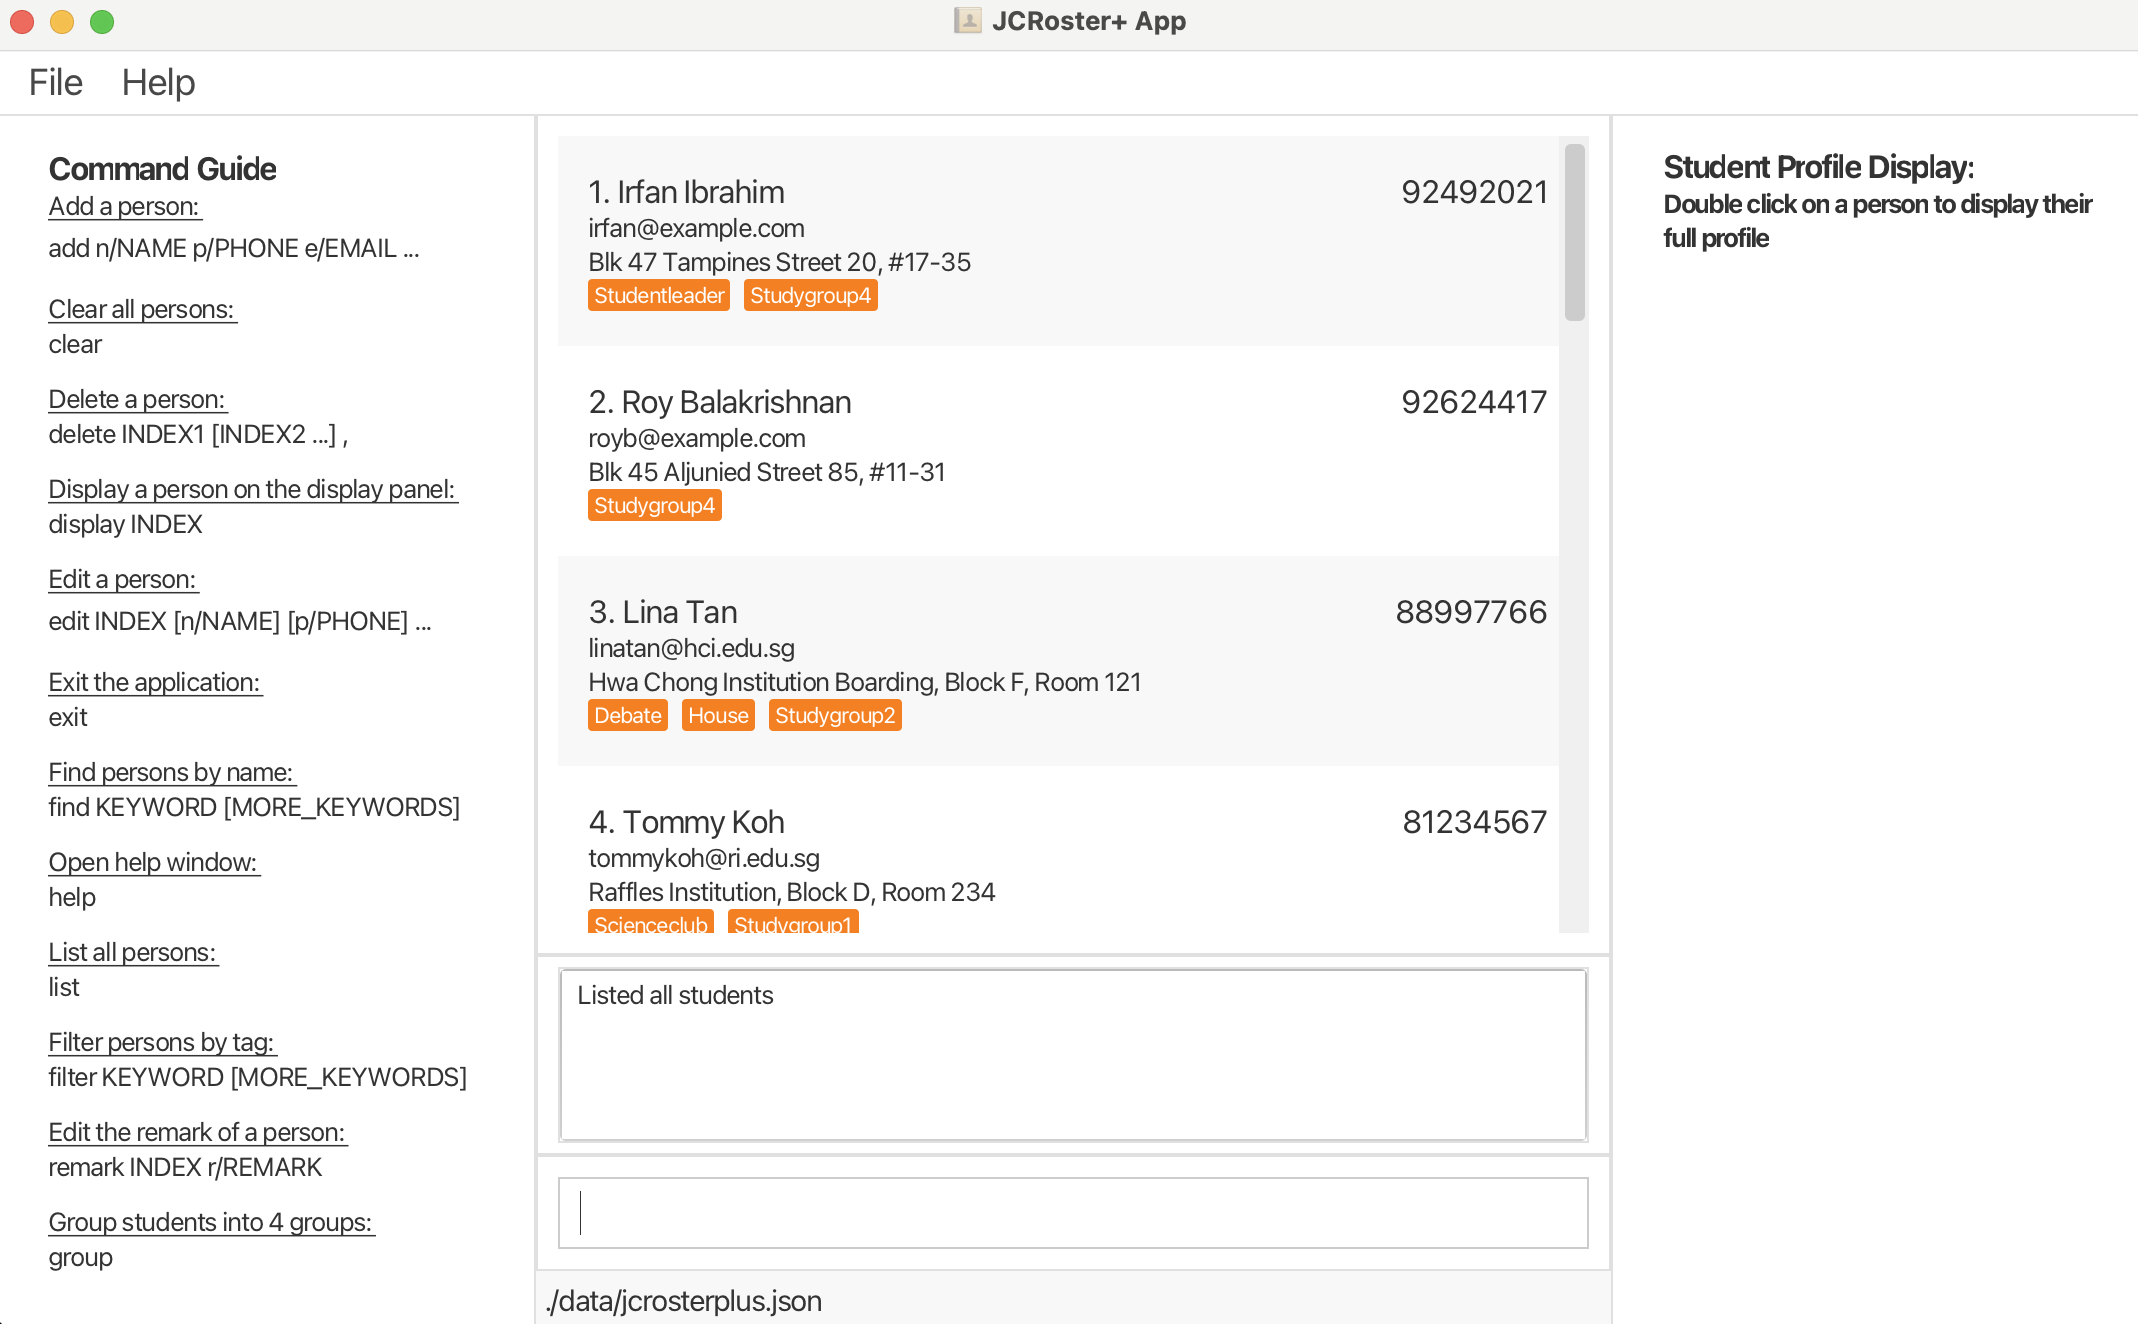
Listing All Students : list
Shows a list of all students in the JCRoster+.
Format: list
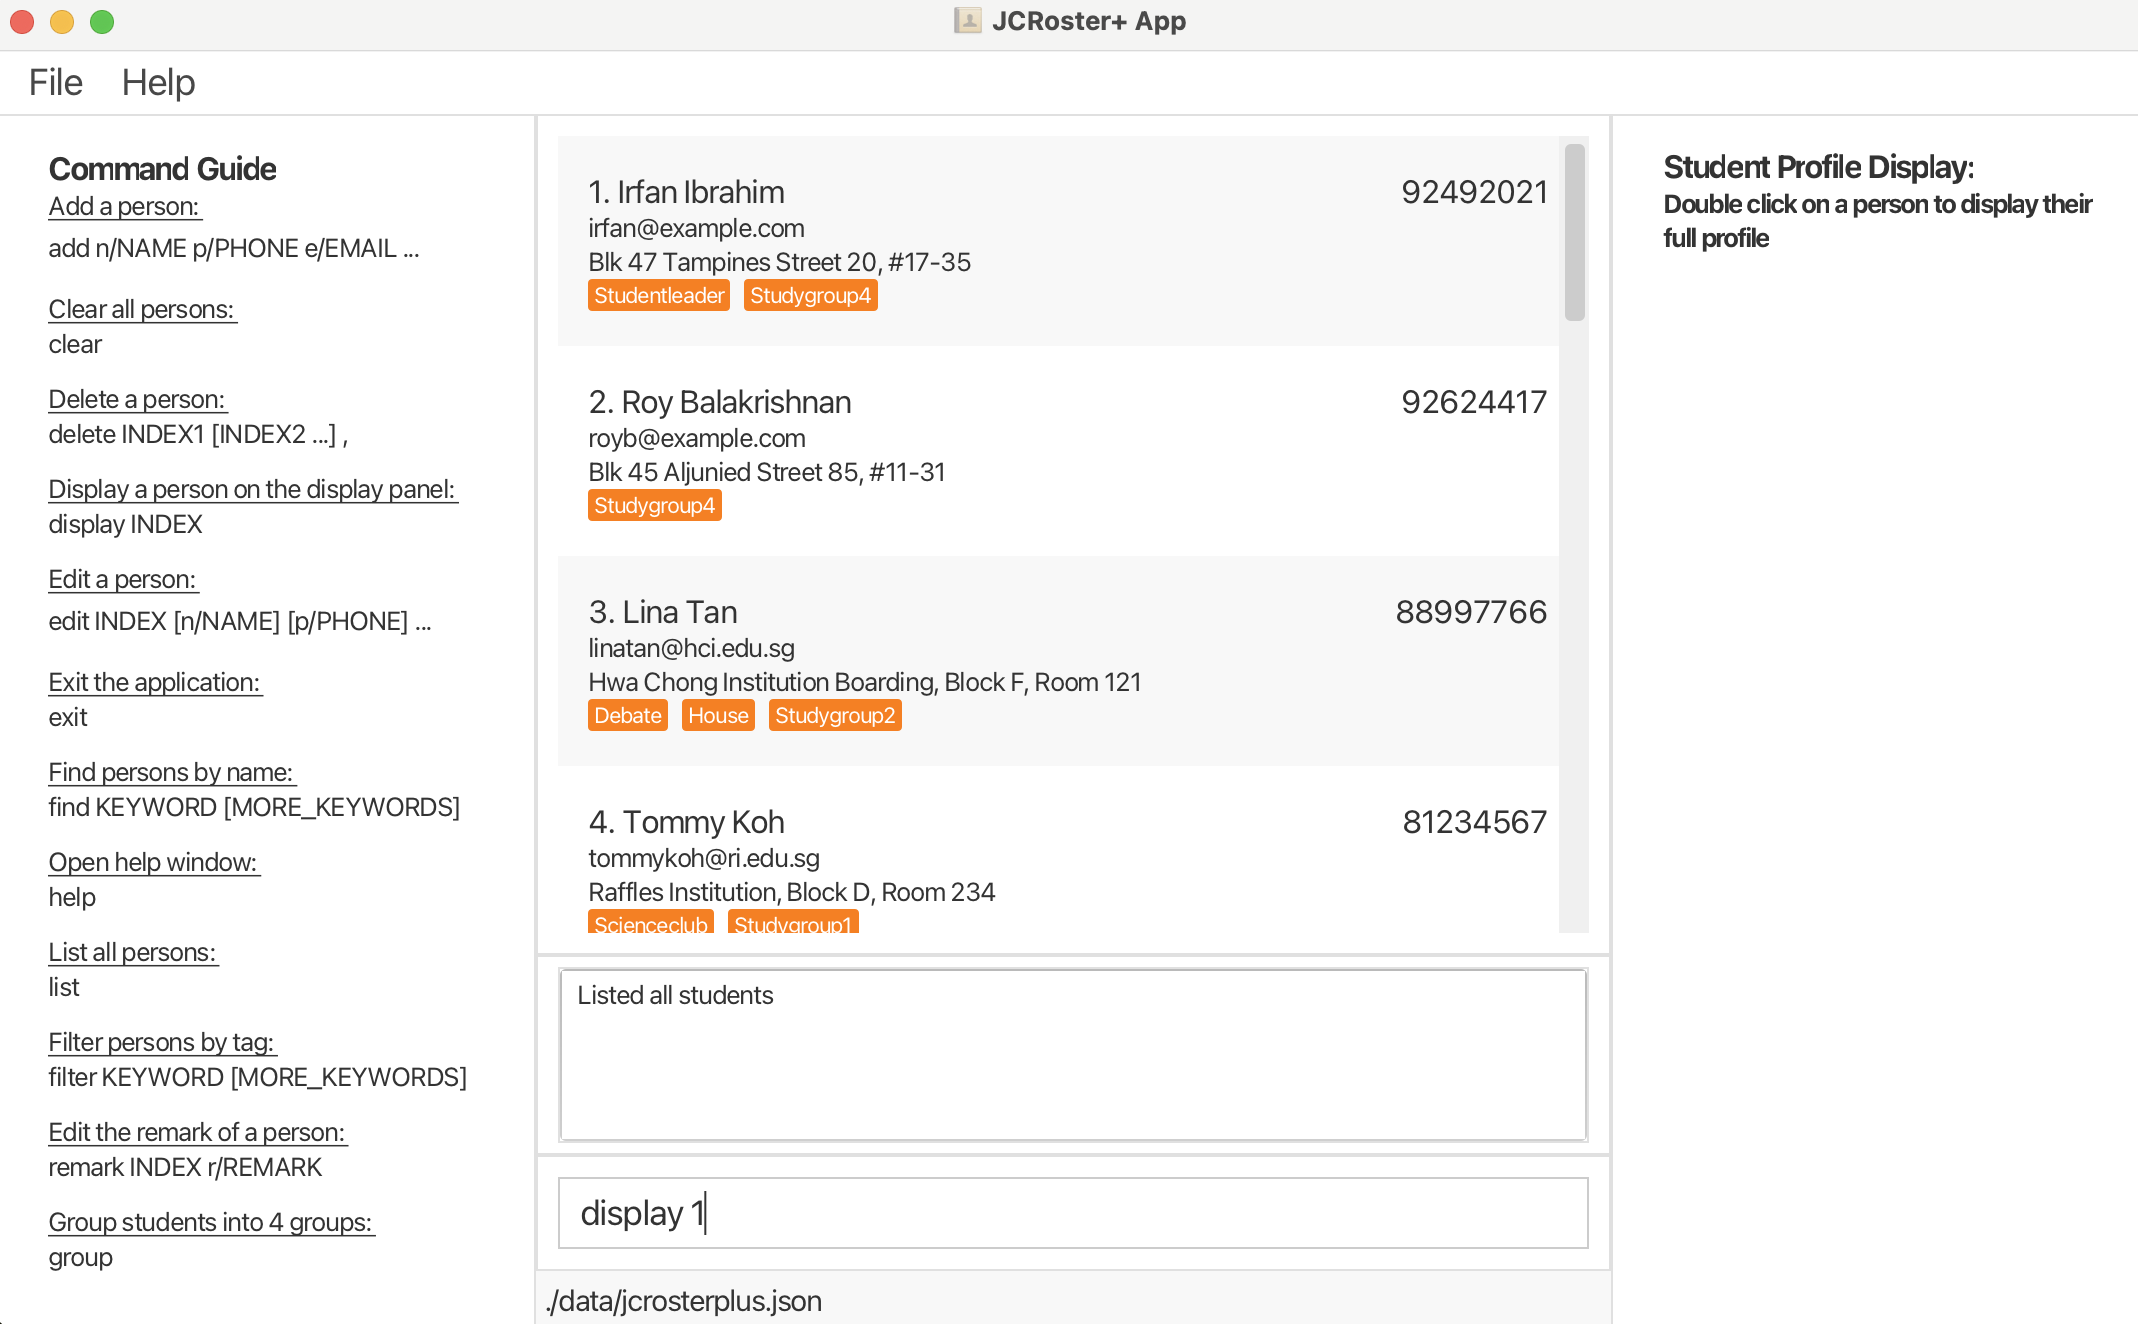
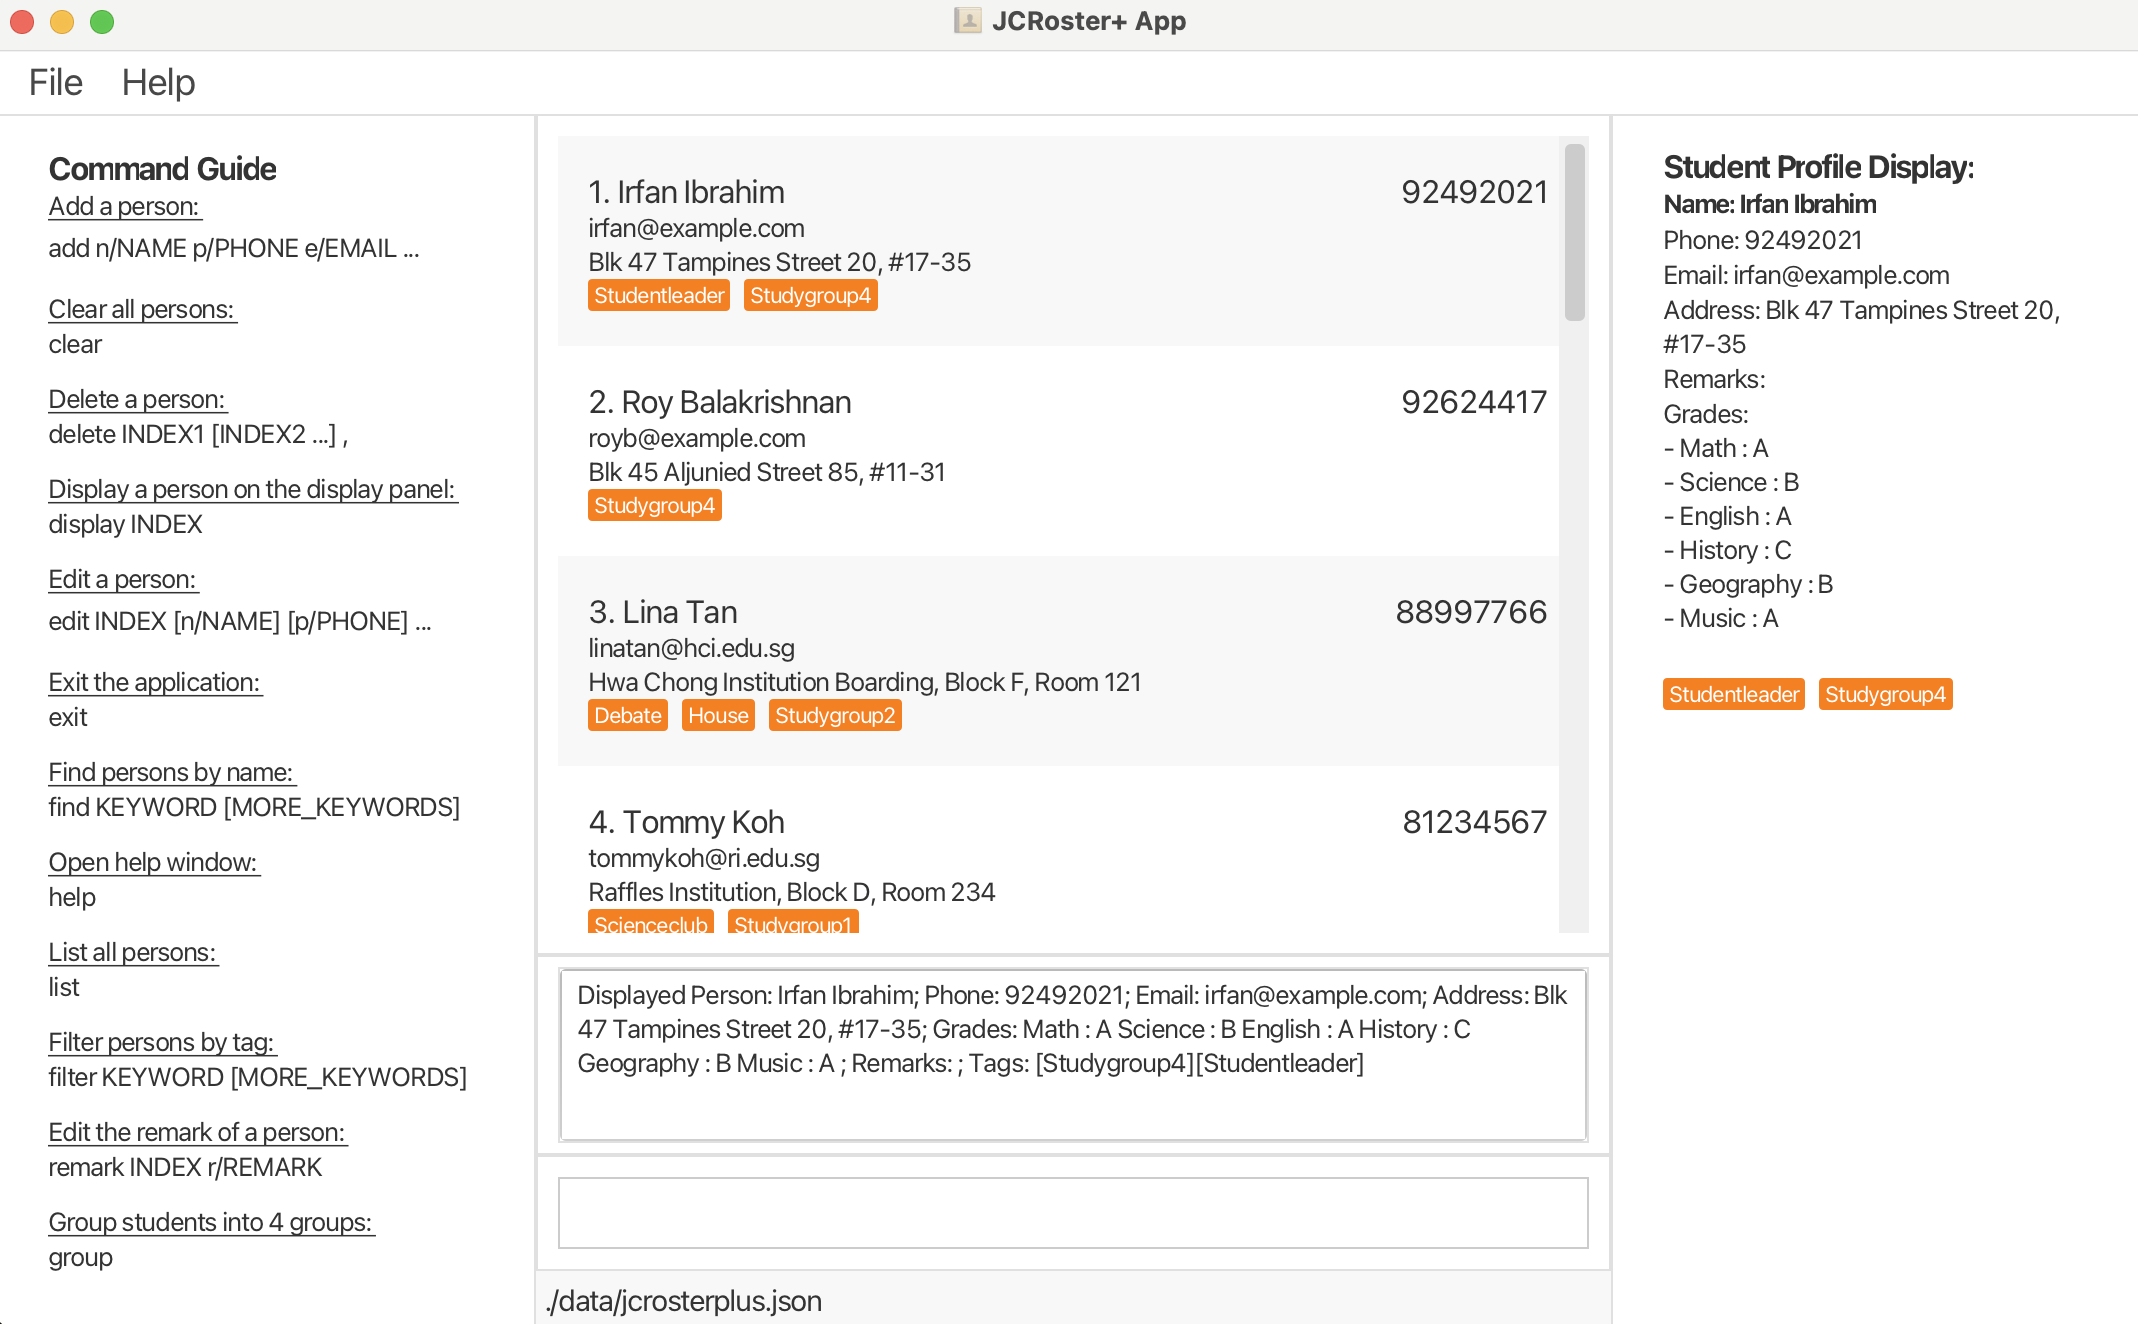
Displaying a Student's Details : display
Displays all contact details, grades and tags of a student in the right panel of the JCRoster+ GUI.
Format: display INDEX
- Displays the student at the specified index in the displayed student list.
- You can only display one student at a time, only one index can be passed into the display command.
- The index must be a positive integer 1, 2, 3, ...
- After updating any of the student's details, re-run the display command to see the updated details!
Tip: Double-clicking on a student in the list also calls the display command!
Examples:
display 1displays the details of the 1st student in the list.
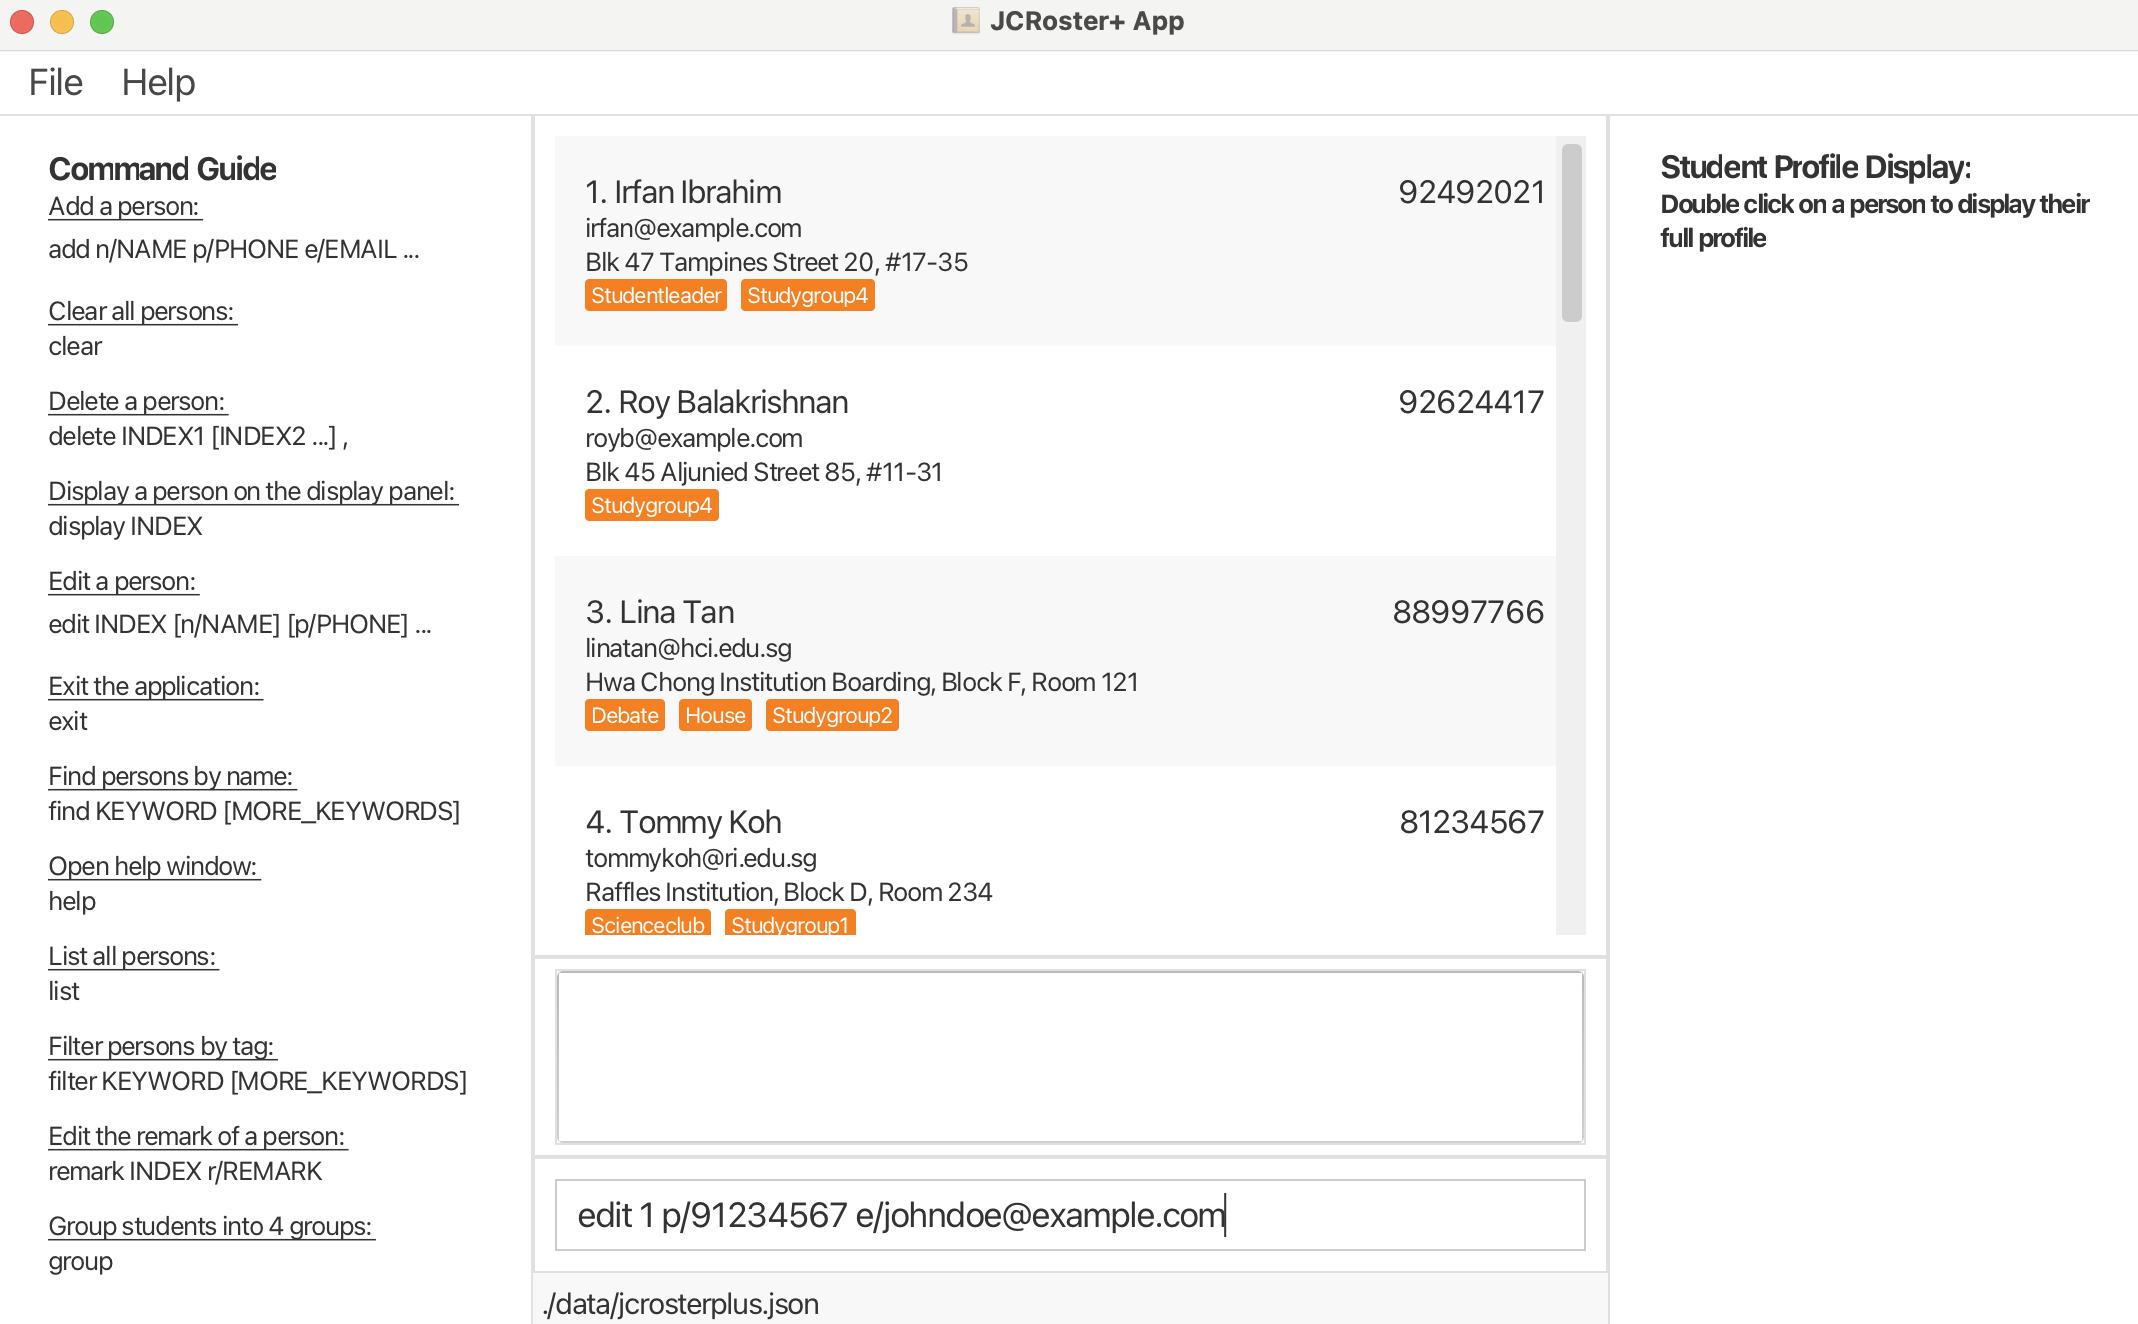
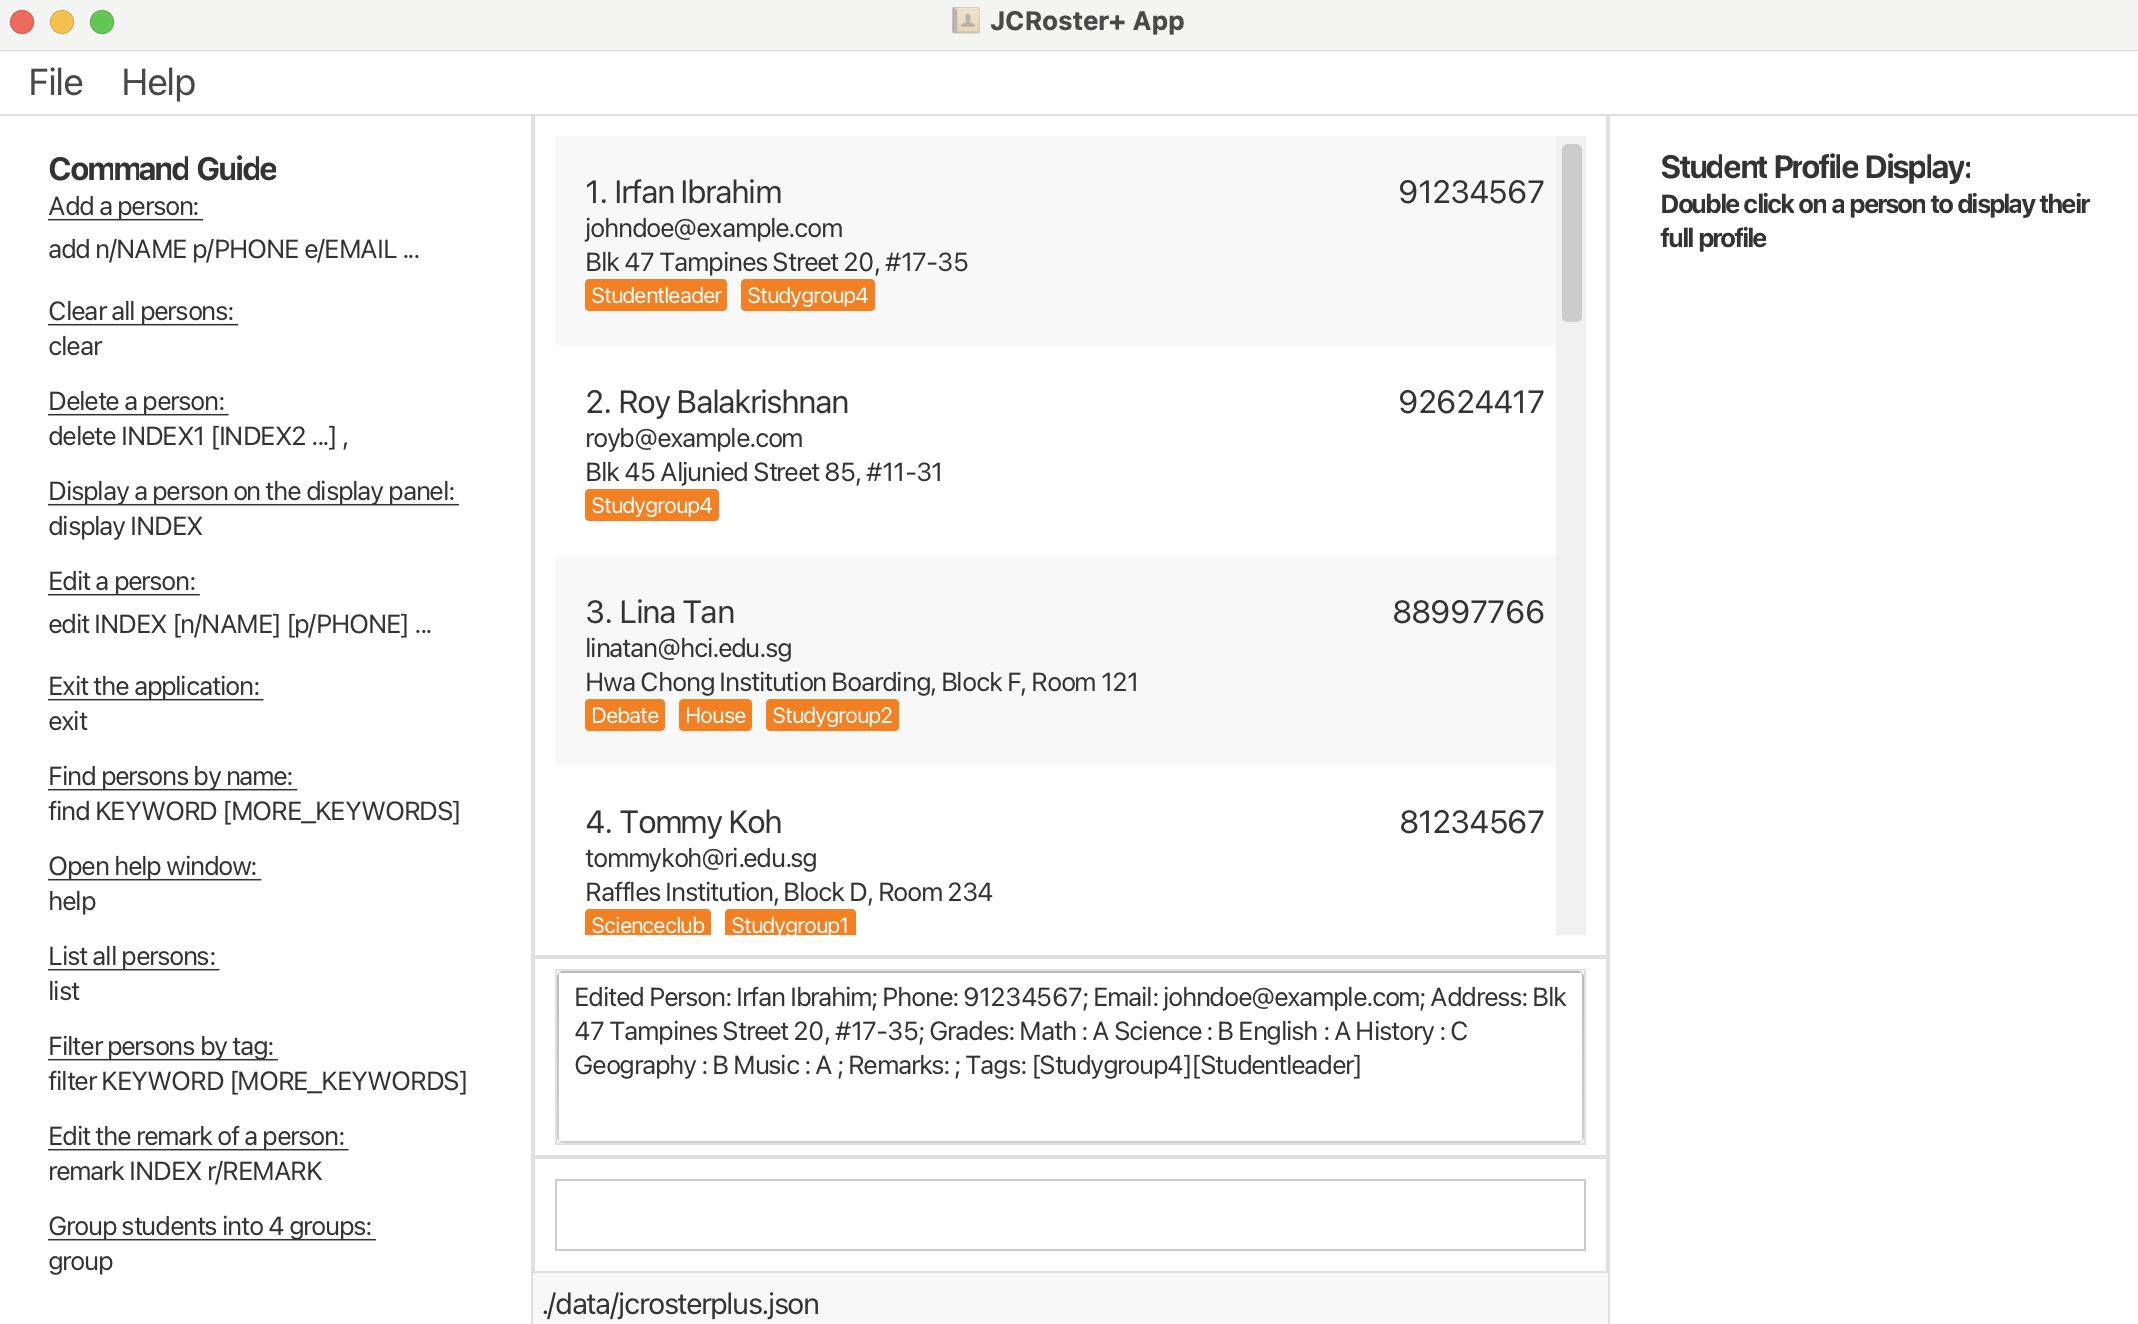
Editing a Student : edit
Edits an existing student in the JCRoster+.
Format: edit INDEX [n/NAME] [p/PHONE] [e/EMAIL] [a/ADDRESS] [g/SUBJECT1:GRADE, ...SUBJECT6:GRADE] [t/TAG]…
- Edits the student at the specified
INDEX. The index refers to the index number shown in the displayed student list. The index must be a positive integer 1, 2, 3, … - At least one of the optional fields must be provided.
- Existing values will be updated to the input values provided.
- When editing tags, all existing tags of the student will be removed i.e adding of tags is not cumulative.
- You can remove all of a student’s tags by typing
t/without specifying any tags after it. - To edit the student’s grades, you must specify all 6 subjects and their grades. The system will not check if the subject names are valid or not.
Examples:
edit 1 p/91234567 e/johndoe@example.comedits the phone number and email address of the 1st student to be91234567andjohndoe@example.comrespectively.edit 2 n/Betsy Crower t/Edits the name of the 2nd student to beBetsy Crowerand removes all existing tags.edit 2 g/Maths:A, Geography:B, History:A, Economics:A, Chemistry:C, Biology:Aedits the subjects/grades of the 2nd student to beMaths:A, Geography:B, History:A, Economics:A, Chemistry:C, Biology:A.
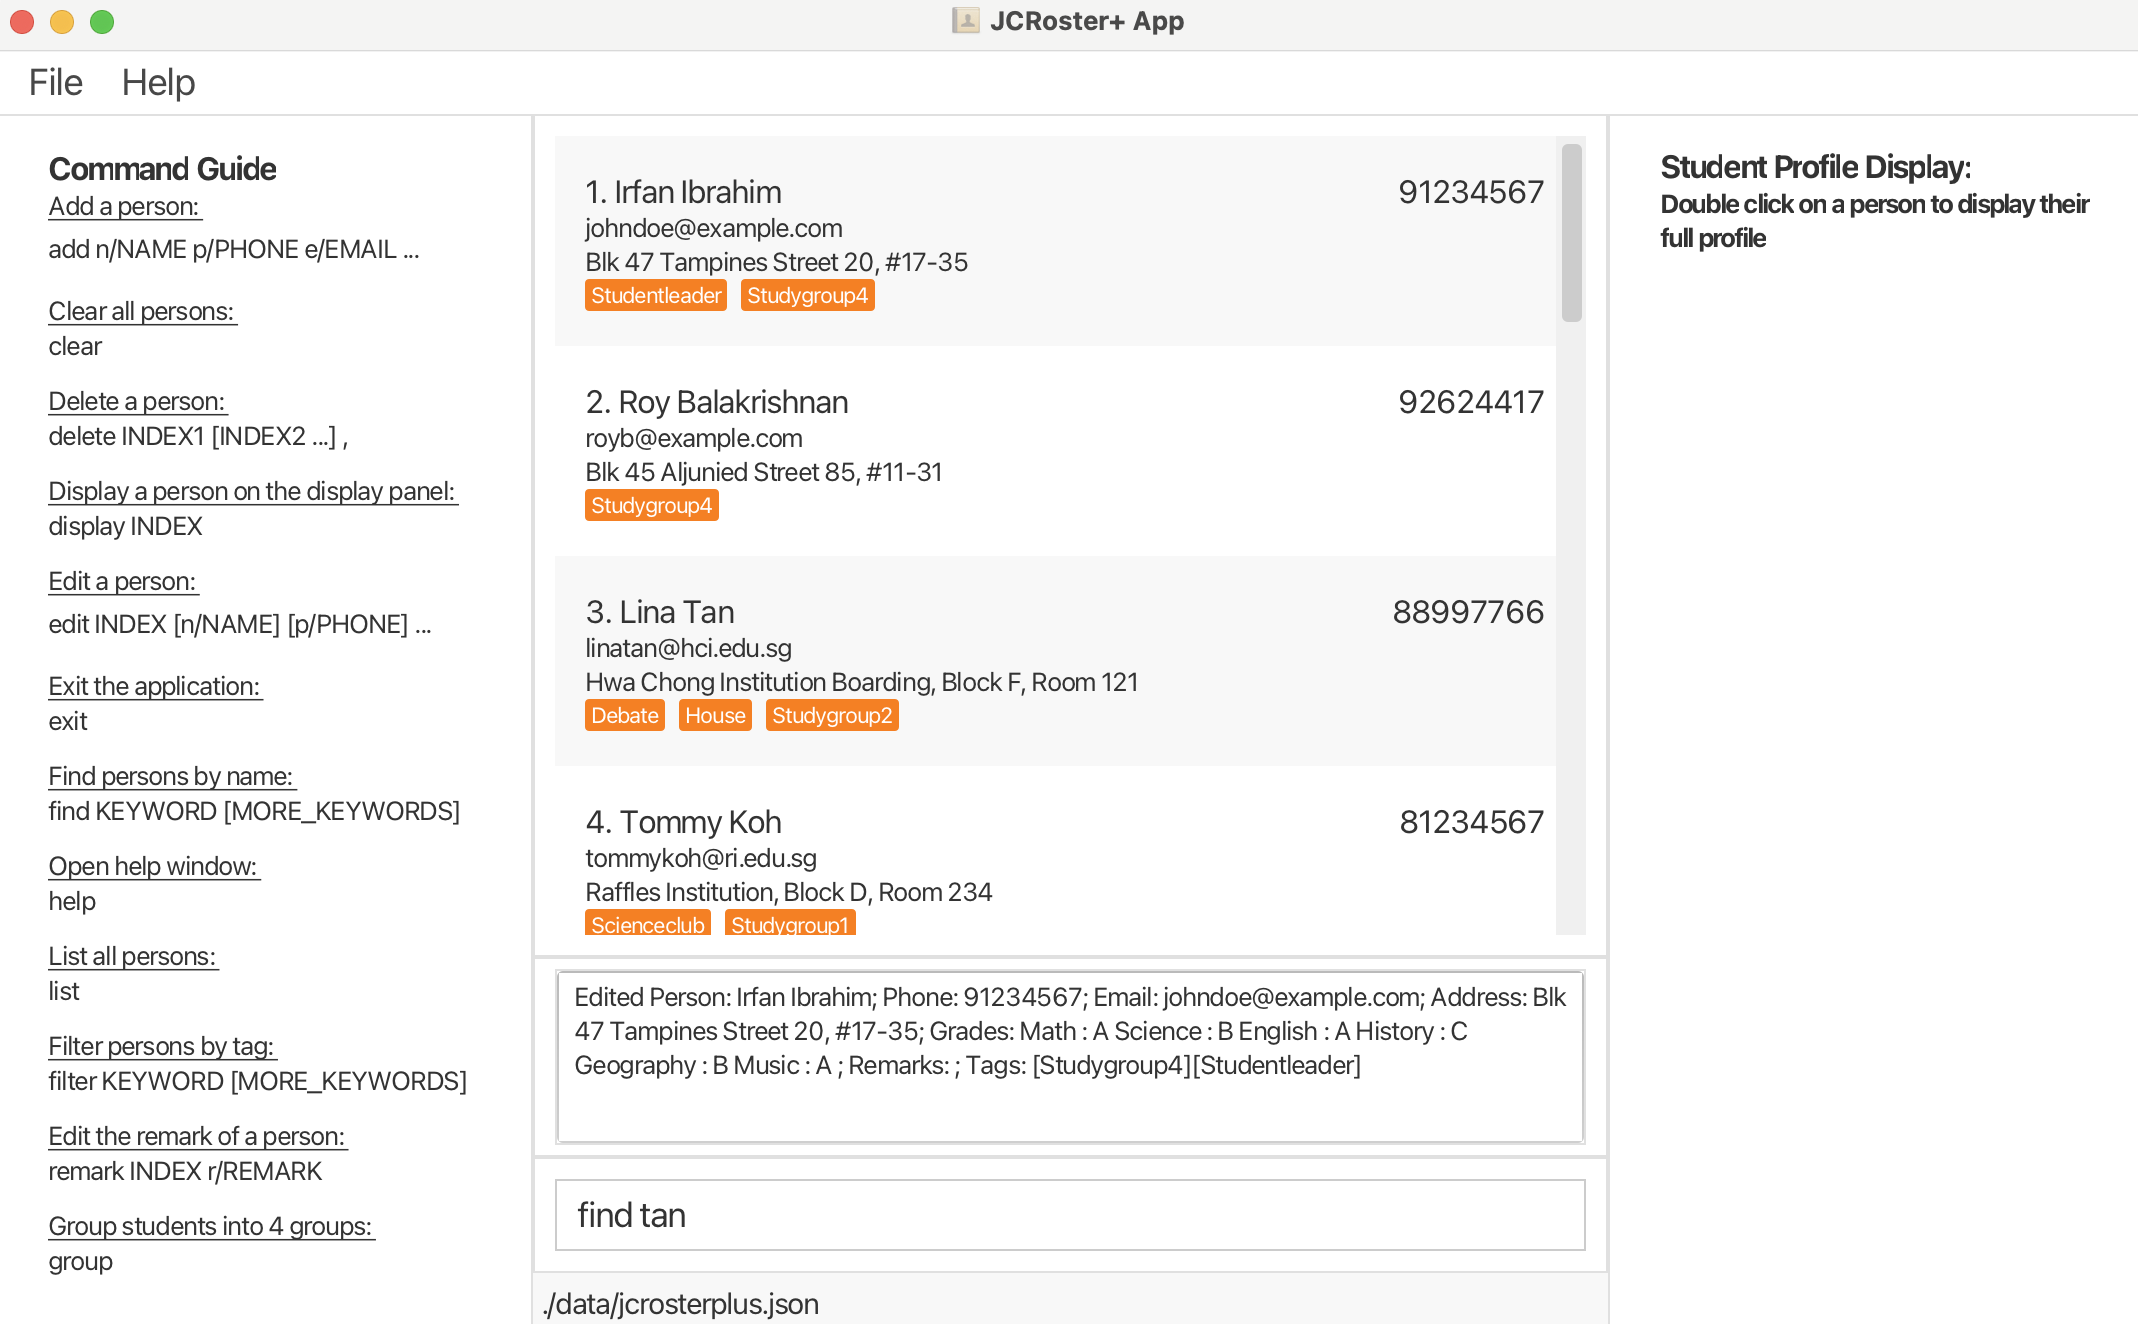
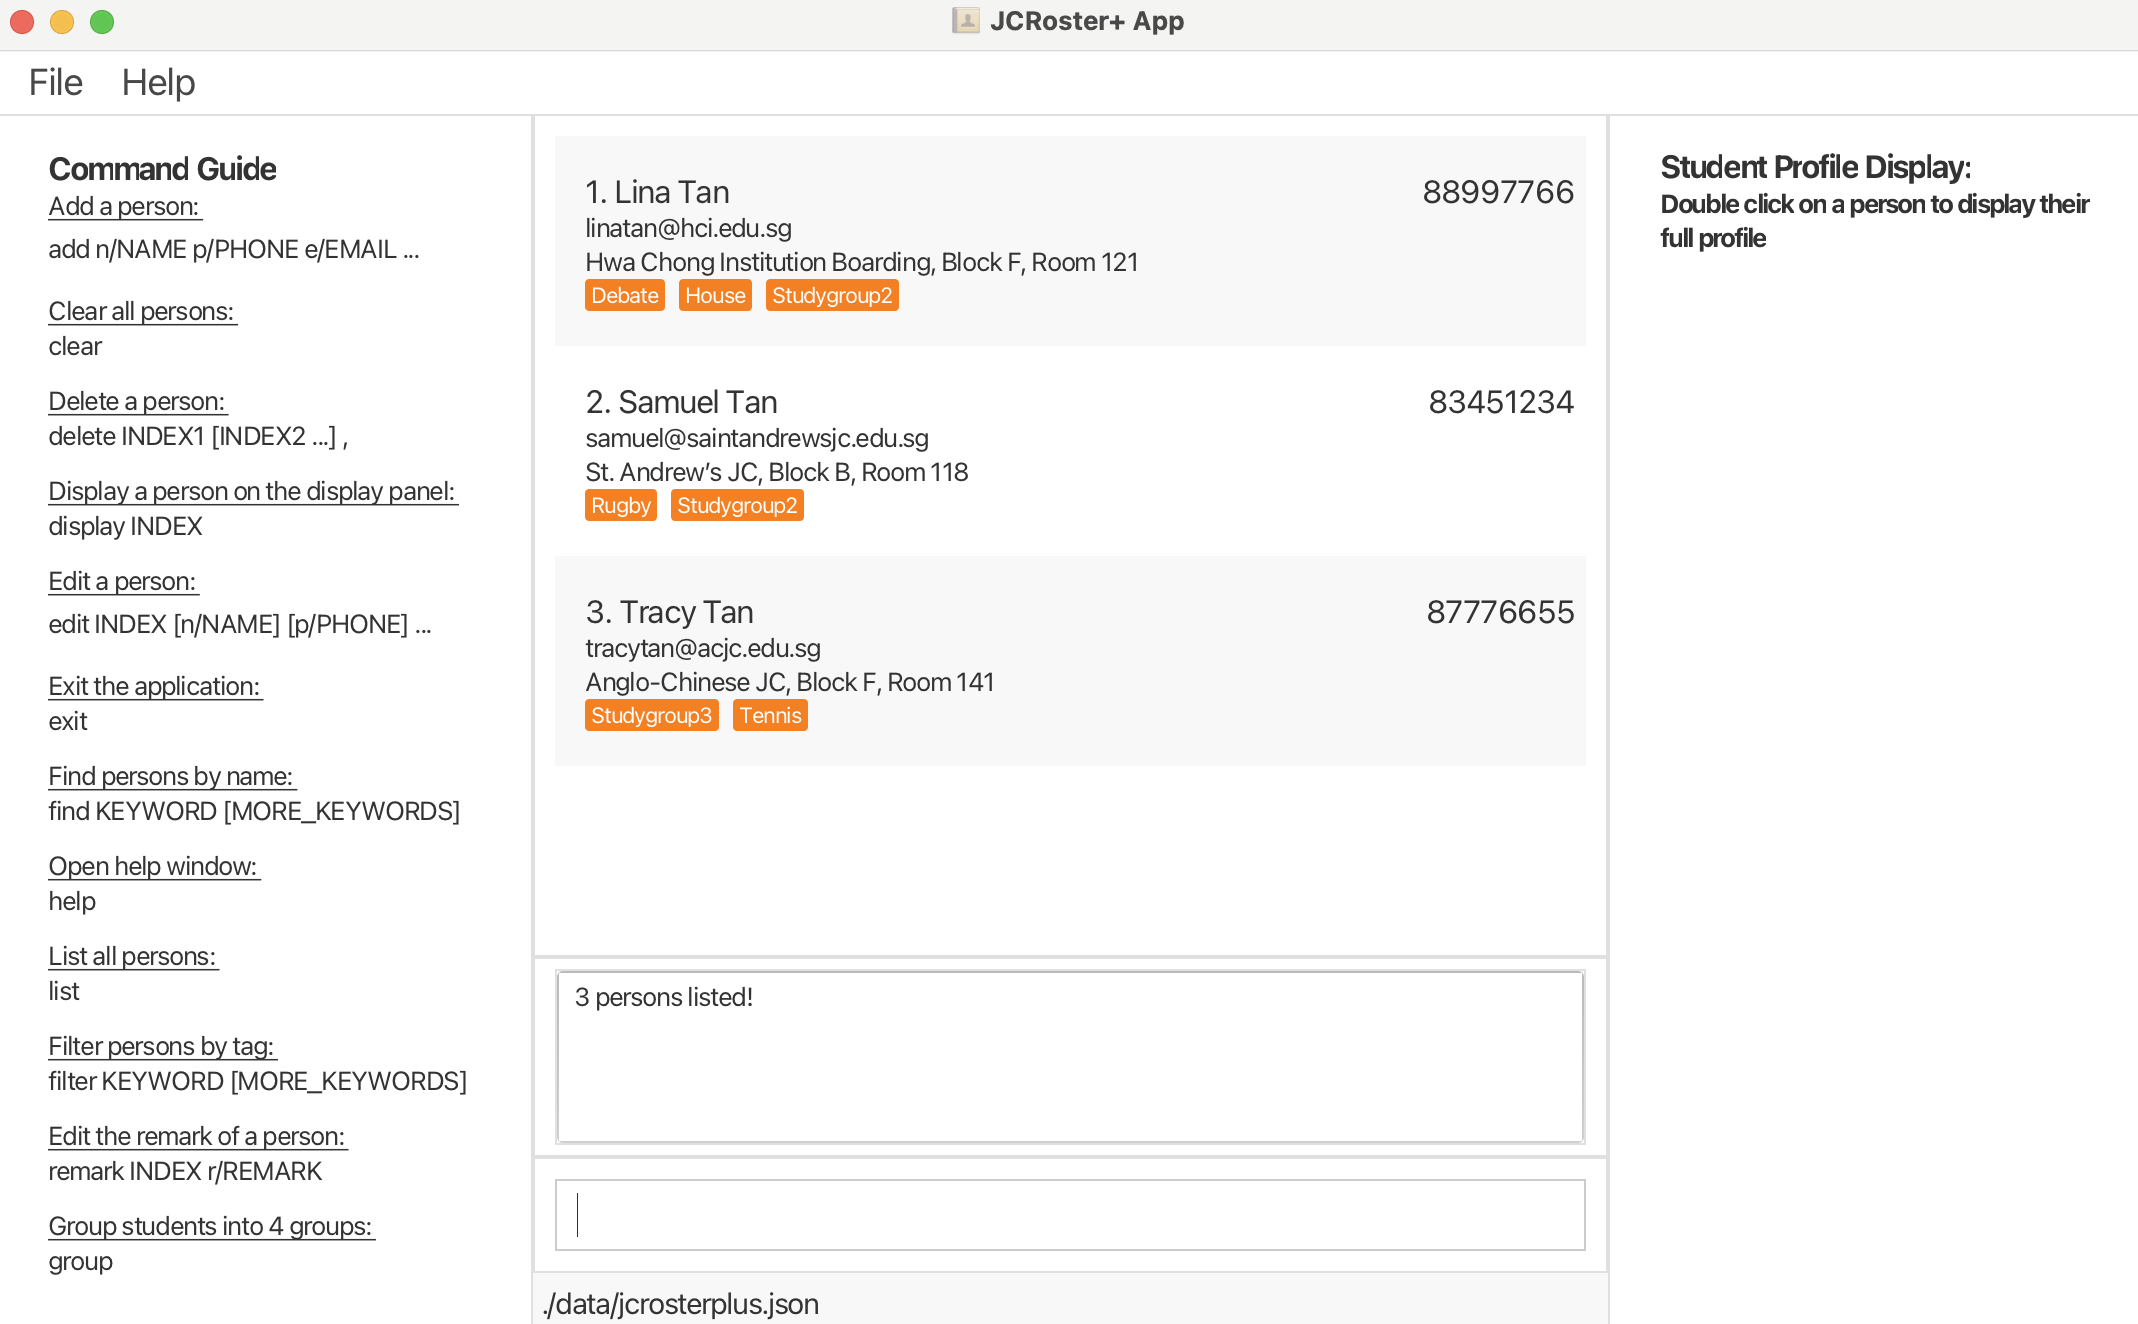
Locating Students by Name: find
Find students whose names contain any of the given keywords.
Format: find KEYWORD [MORE_KEYWORDS]
- The search is case-insensitive. e.g
hanswill matchHans - The order of the keywords does not matter. e.g.
Hans Bowill matchBo Hans - Only the name is searched.
- Non-full words will still be matched e.g.
Hanwill matchHans - Students matching at least one keyword will be returned.
e.g.
Hans Bowill returnHans Gruber,Bo Yang
Examples:
find JohnreturnsjohnandJohn Doefind alex davidreturnsAlex YeohandDavid Li
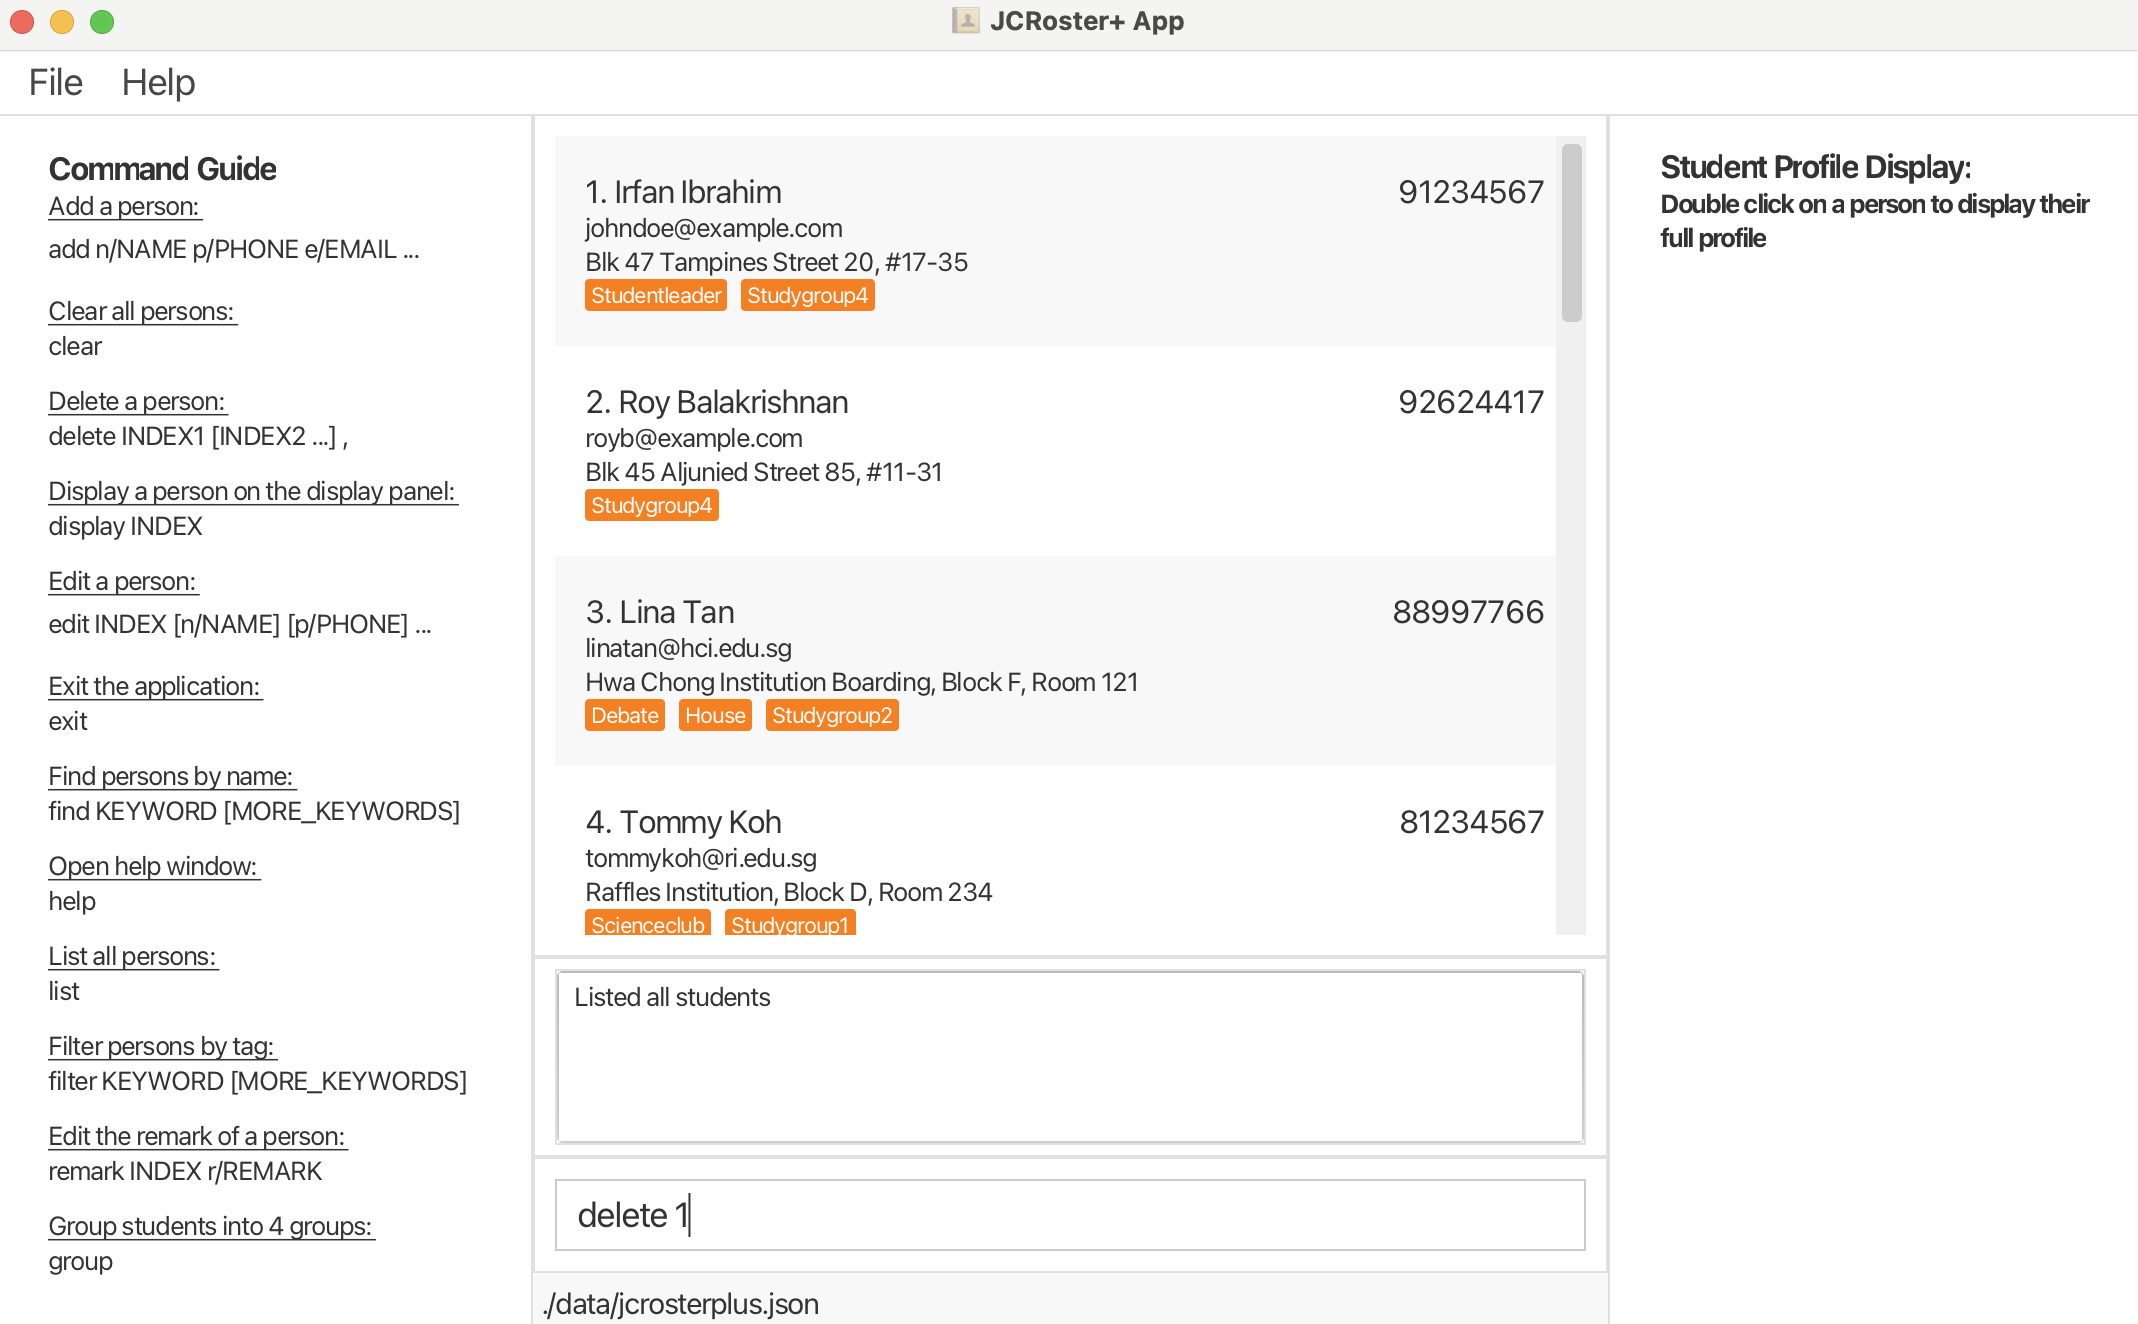
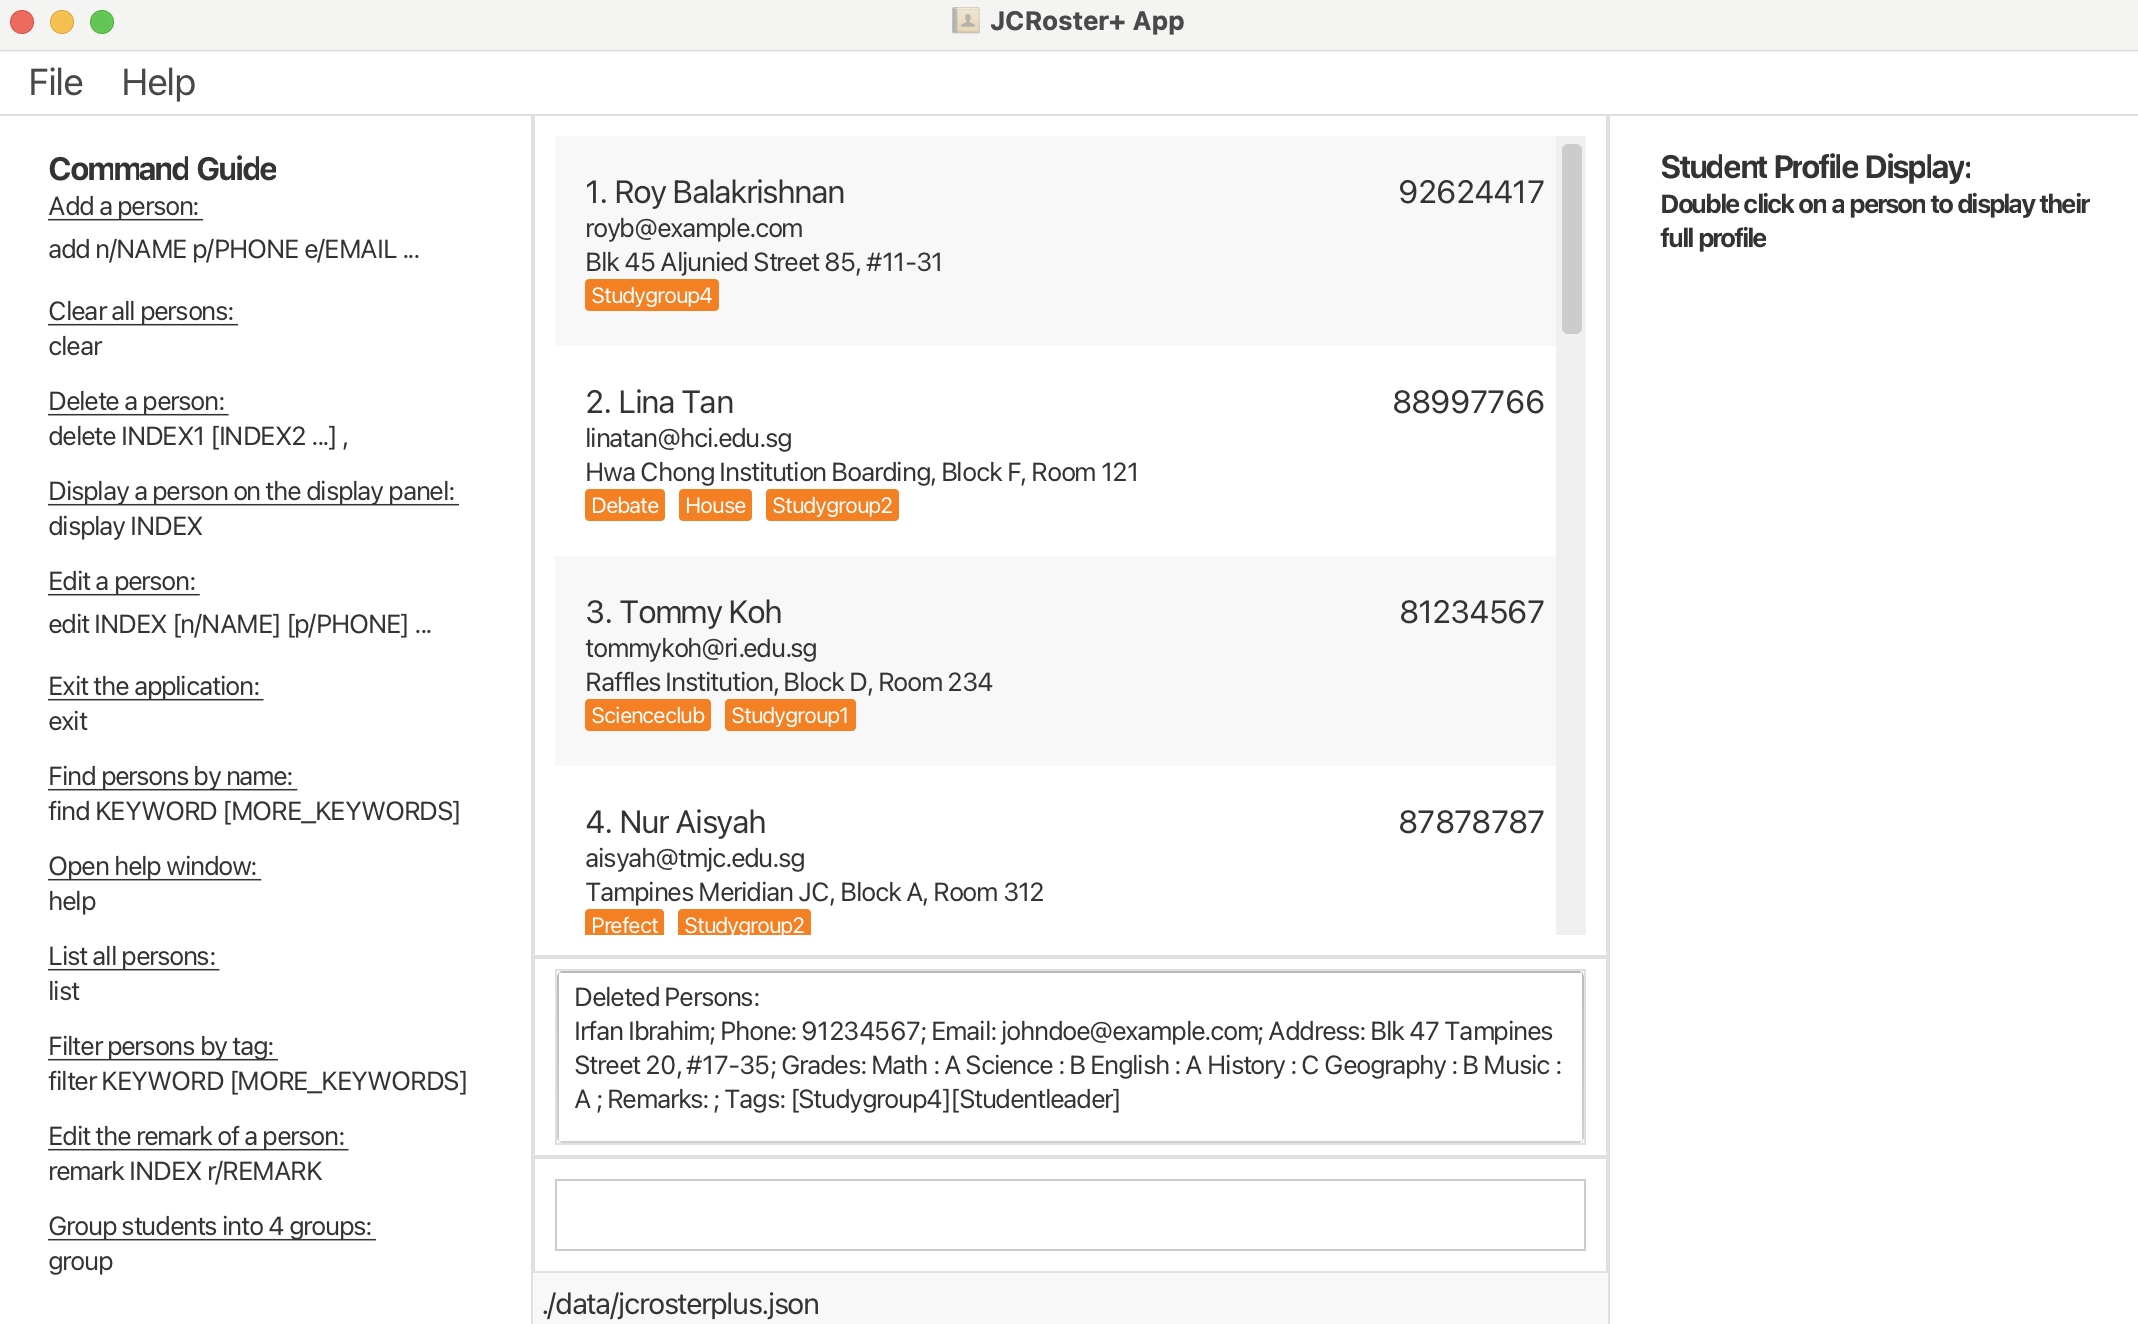
Deleting Students : delete
Deletes the specified students from JCRoster+.
Format: delete INDEX1 INDEX2 ... (up to 10 indices)
- Deletes the students at the specified indices.
- The index refers to the index number shown in the displayed student list.
- The index must be a positive integer 1, 2, 3, …
Examples:
delete 1deletes the 1st student shown in the currently displayed list.delete 2 3deletes the 2nd and 3rd students shown in the currently displayed list.listfollowed bydelete 2deletes the 2nd student in the JCRoster+ currently displayed list.find Betsyfollowed bydelete 1deletes the 1st student in the results of thefindcommand.
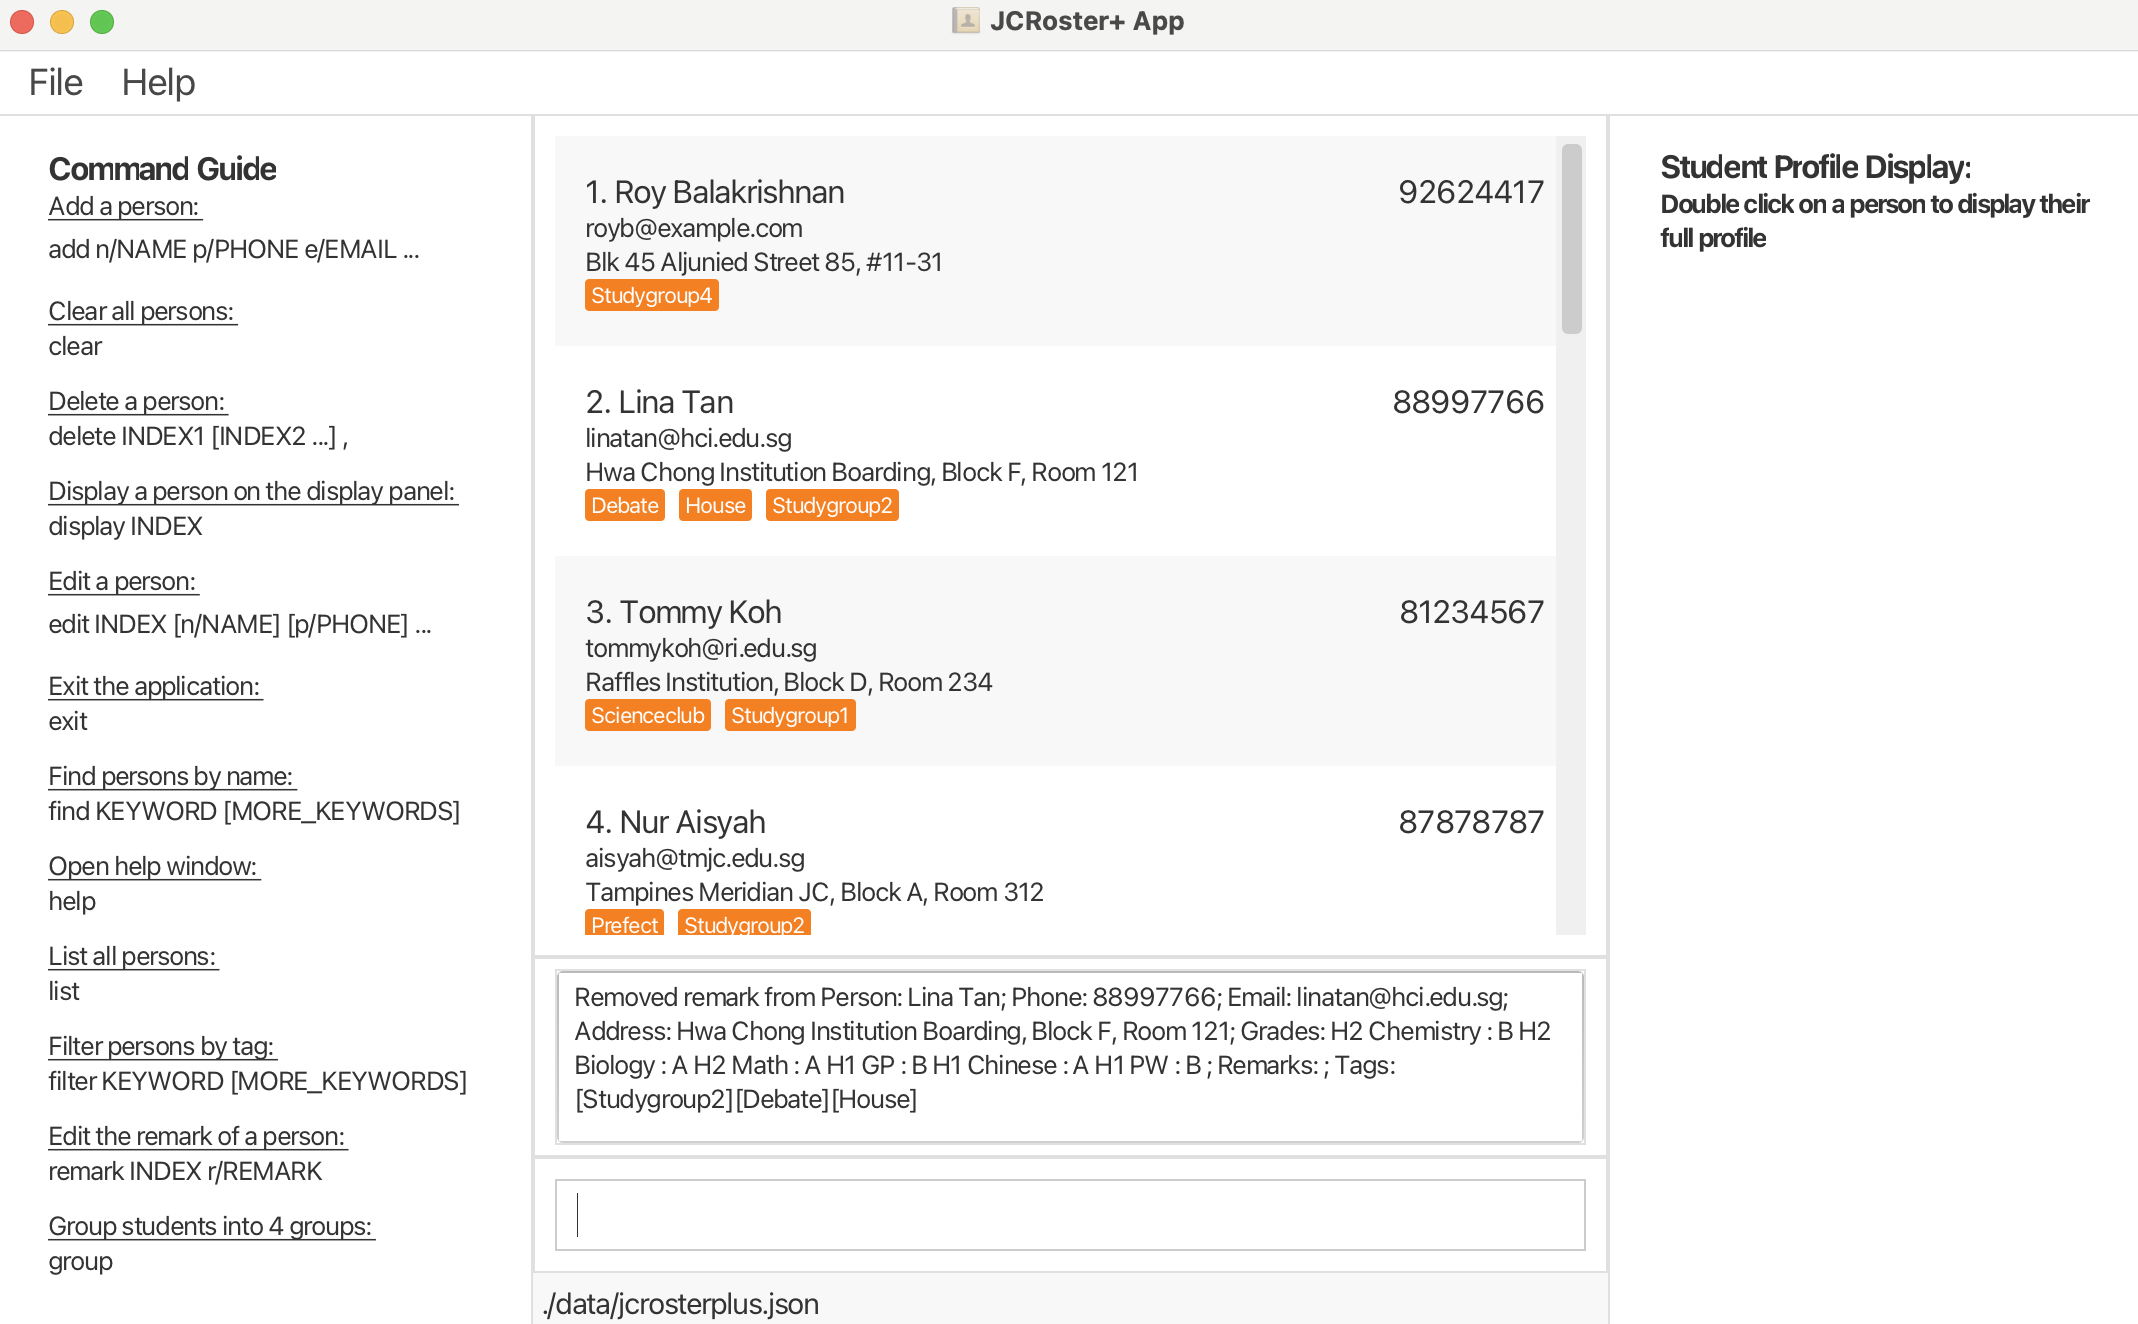
Optional Remarks for Students : remark
Allows for adding, editing or removing remarks of a student.
Format: remark INDEX r/REMARK
Examples:
remark 2 r/removes all remarks of the 2nd student in the currently displayed list.remark 2 r/Needs follow-up on project deadlineadds a remark to the 2nd student in the currently displayed list.remark 2 r/Completed projectedits the remark of the 2nd student in the currently displayed list.

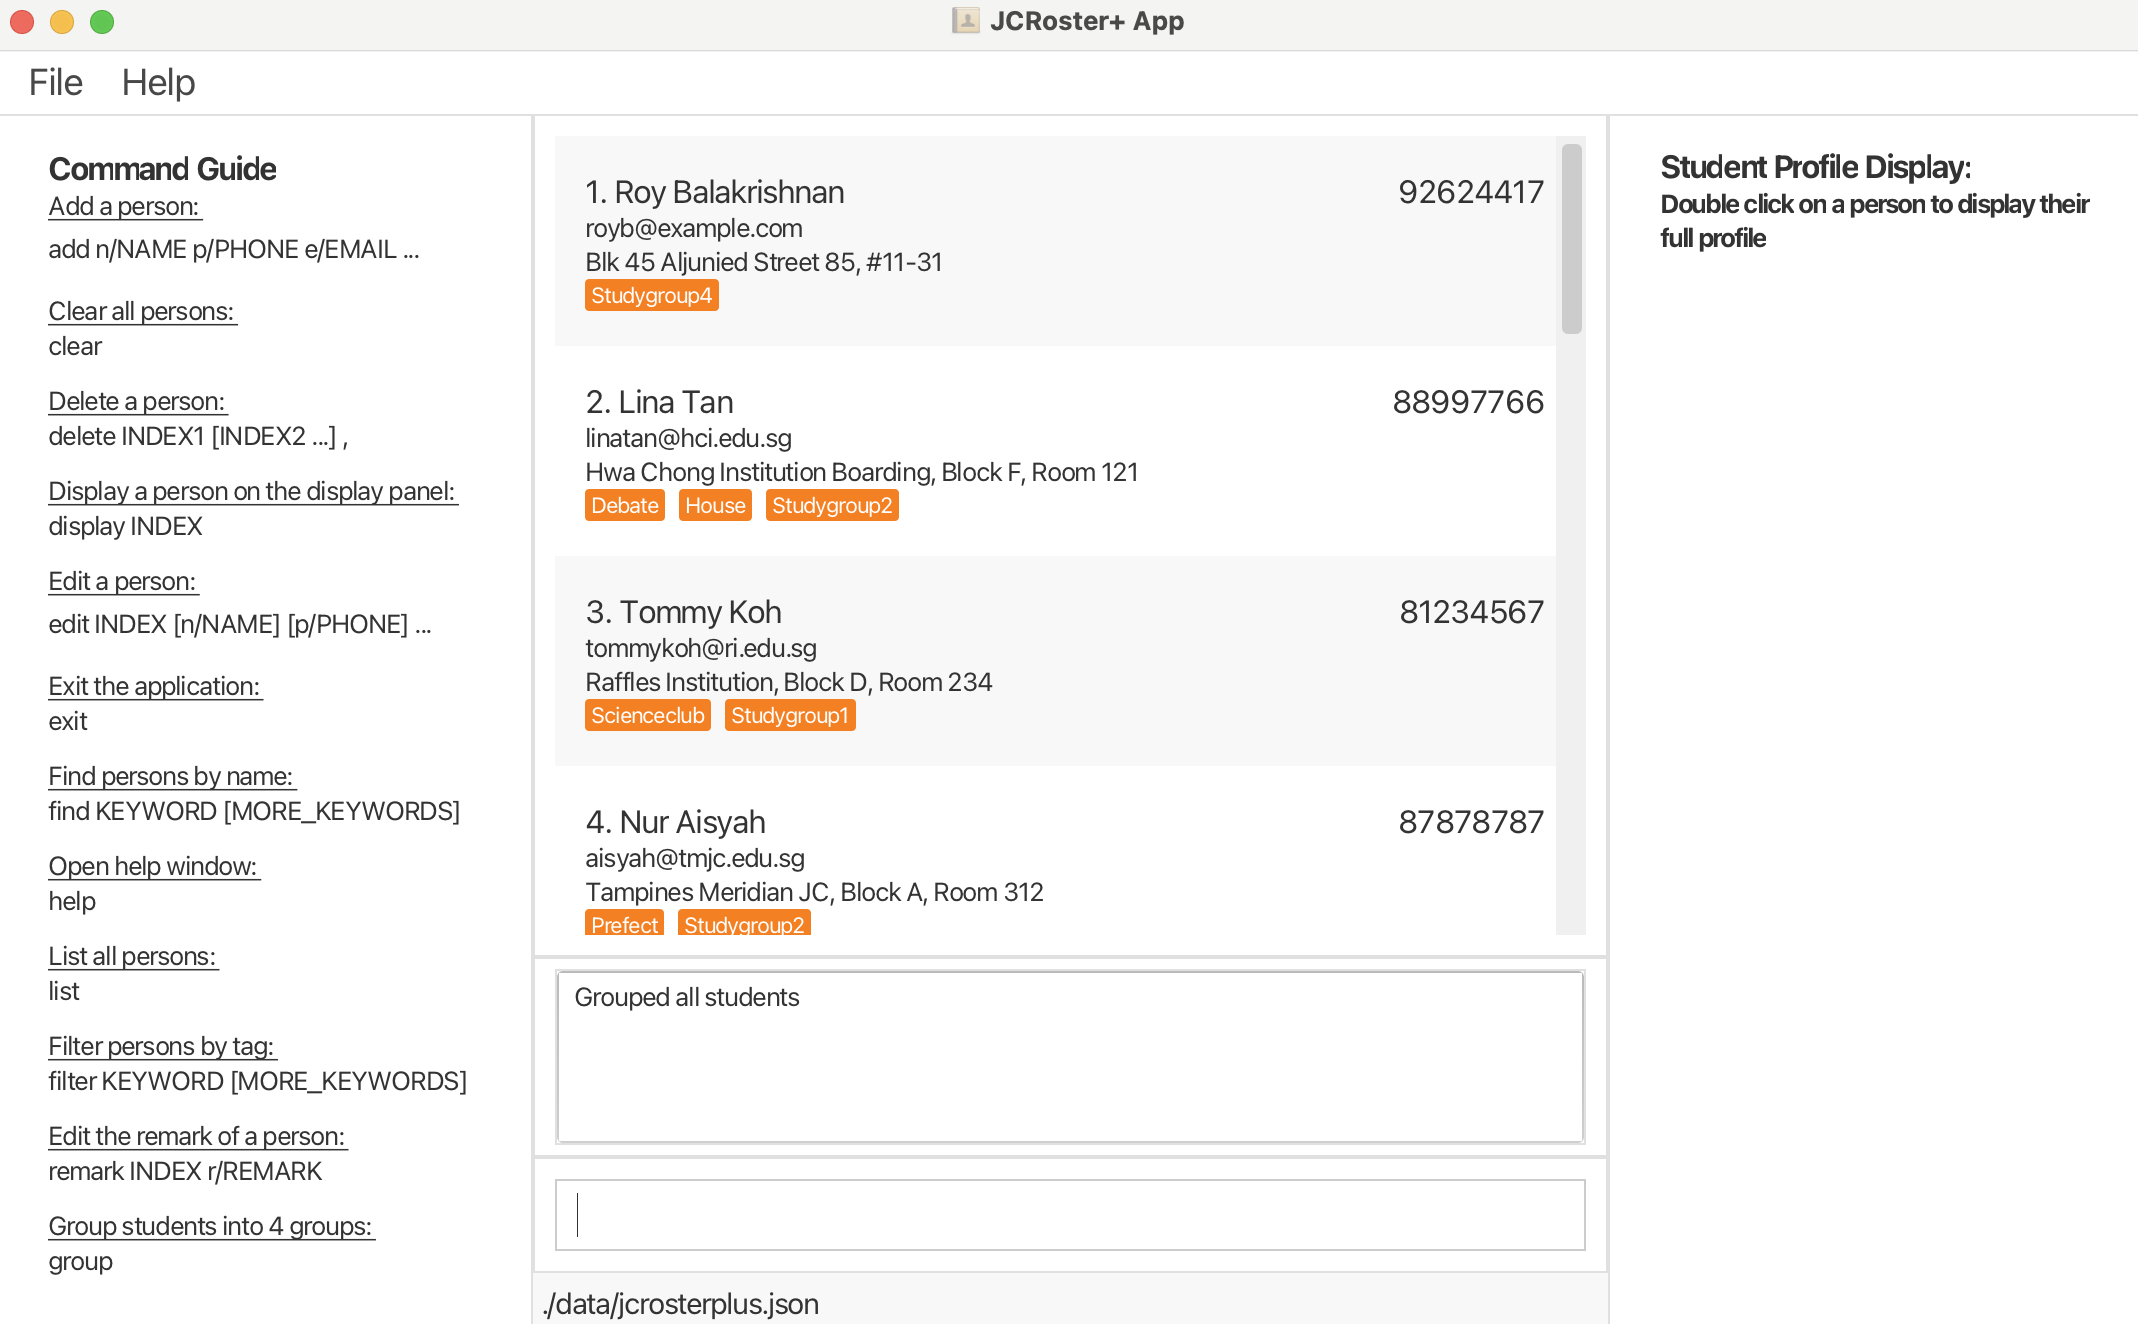
Group Students into 4 Groups : group
Groups students into 4 study groups based on their grades. Their study group will then be displayed as a tag, eg: Studygroup1
Format: group
- The algorithm sorts students by grades and assigns them to groups in a zig-zag pattern:
How does group work: The first student (lowest grades) goes into Group 1, the second into Group 2, the third into Group 3, the forth into Group 4, the fifth back to Group 4, the sixth into group 3, and so on. This ensures a fair and balanced mix of students in each group.
- The system will automatically recalculate and reassign study groups (i.e. their
Studygrouptags will be updated) to maintain balance and fairness in these 2 cases:- Deleting any student
- Editing any student's grade
Tip: Manually edit a student's study group by editing their tags.
Examples:
groupgroups all students into 4 study groups based on their grades.

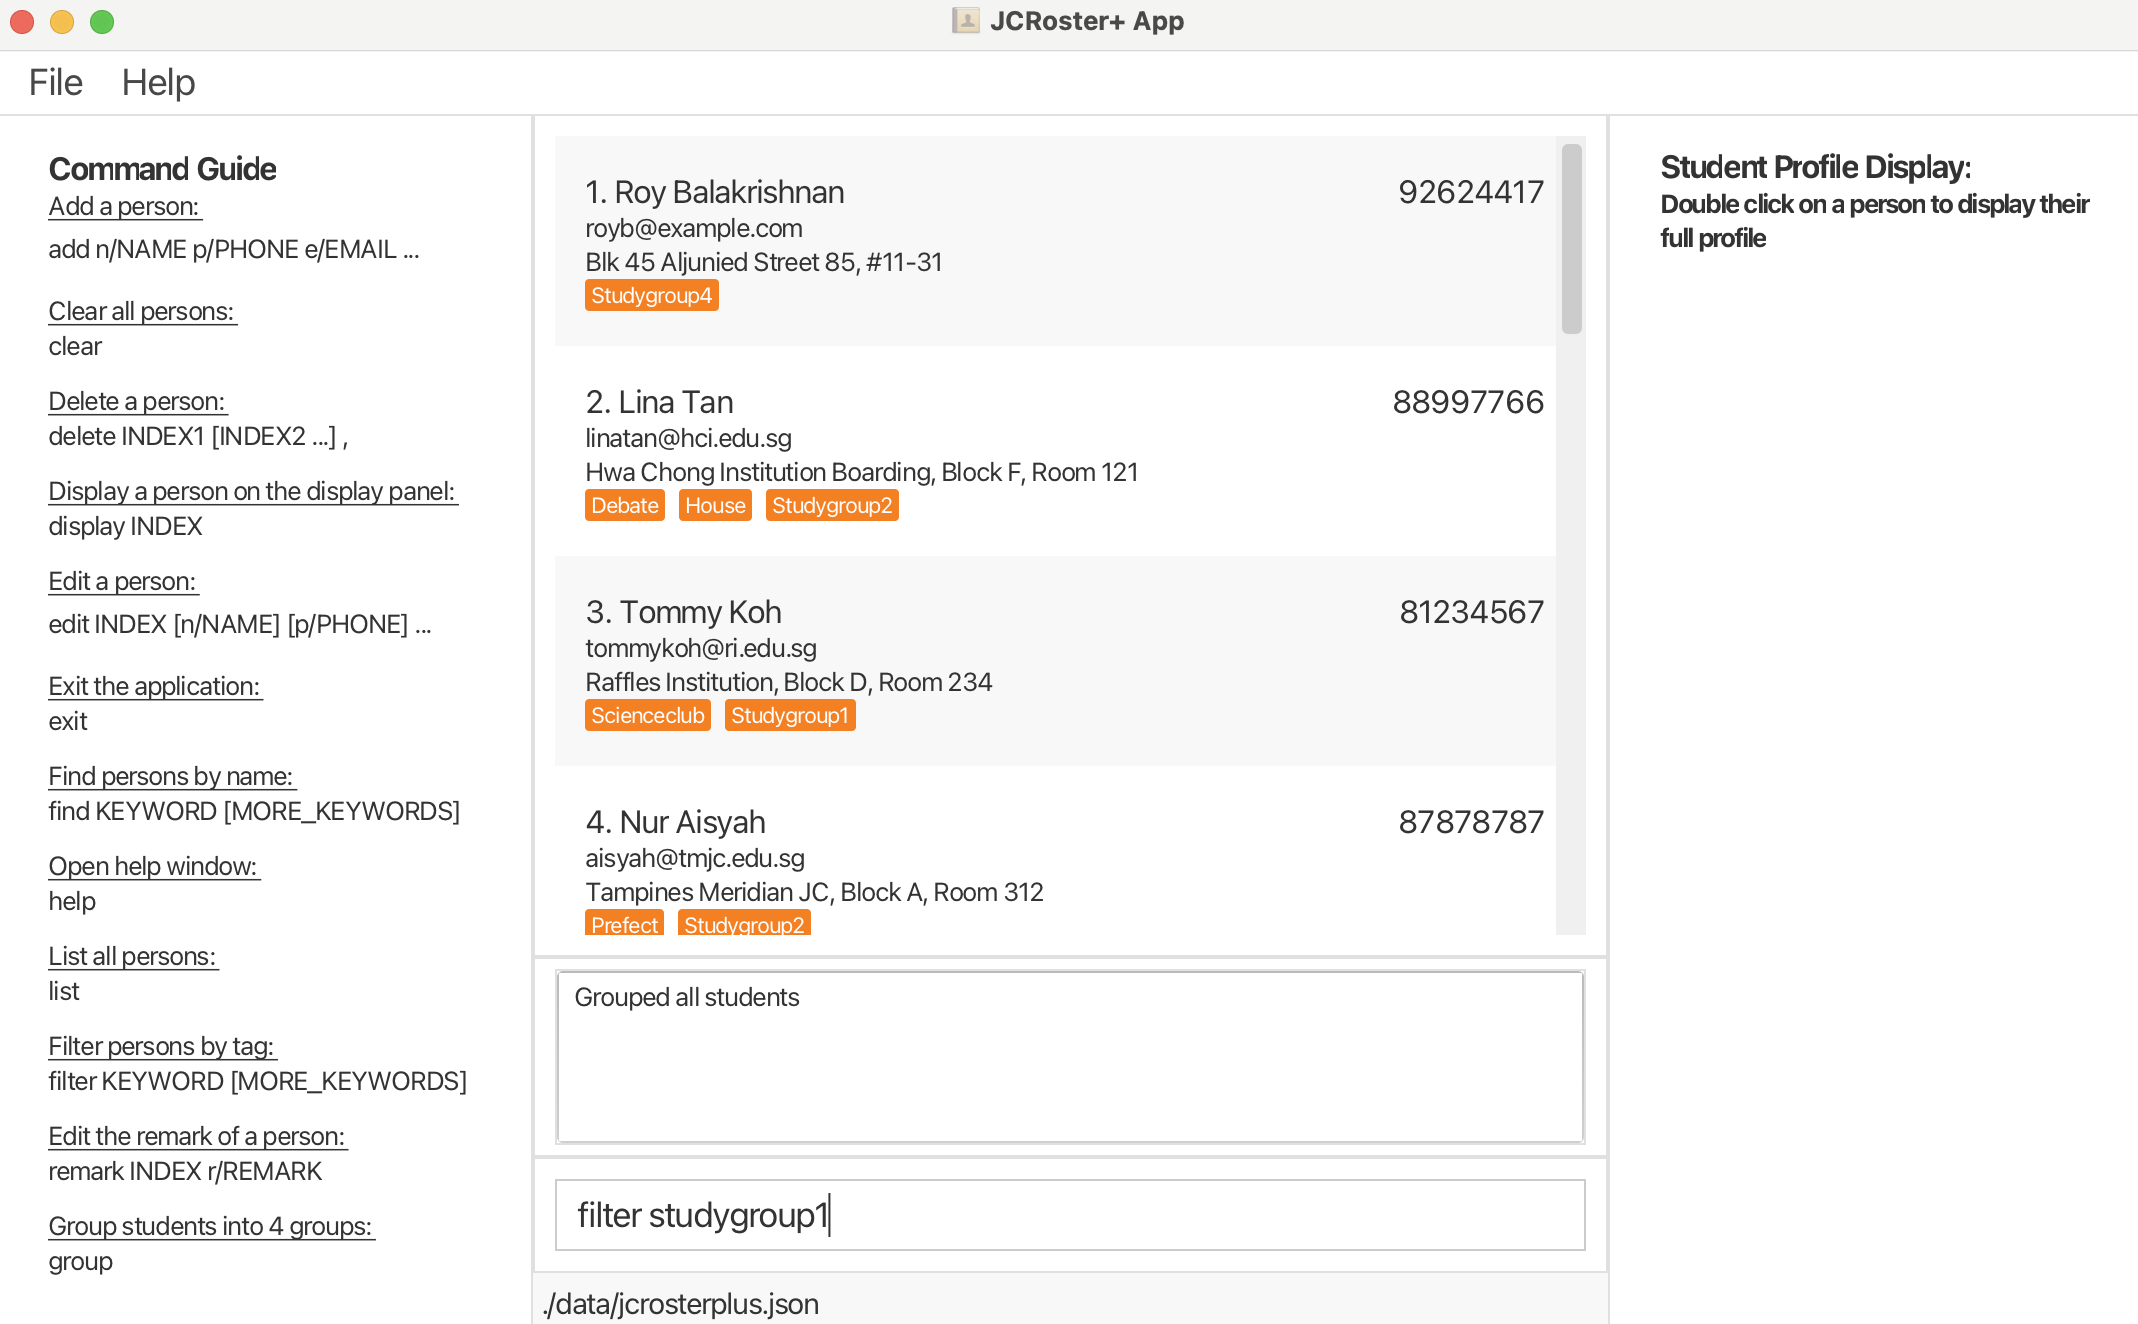
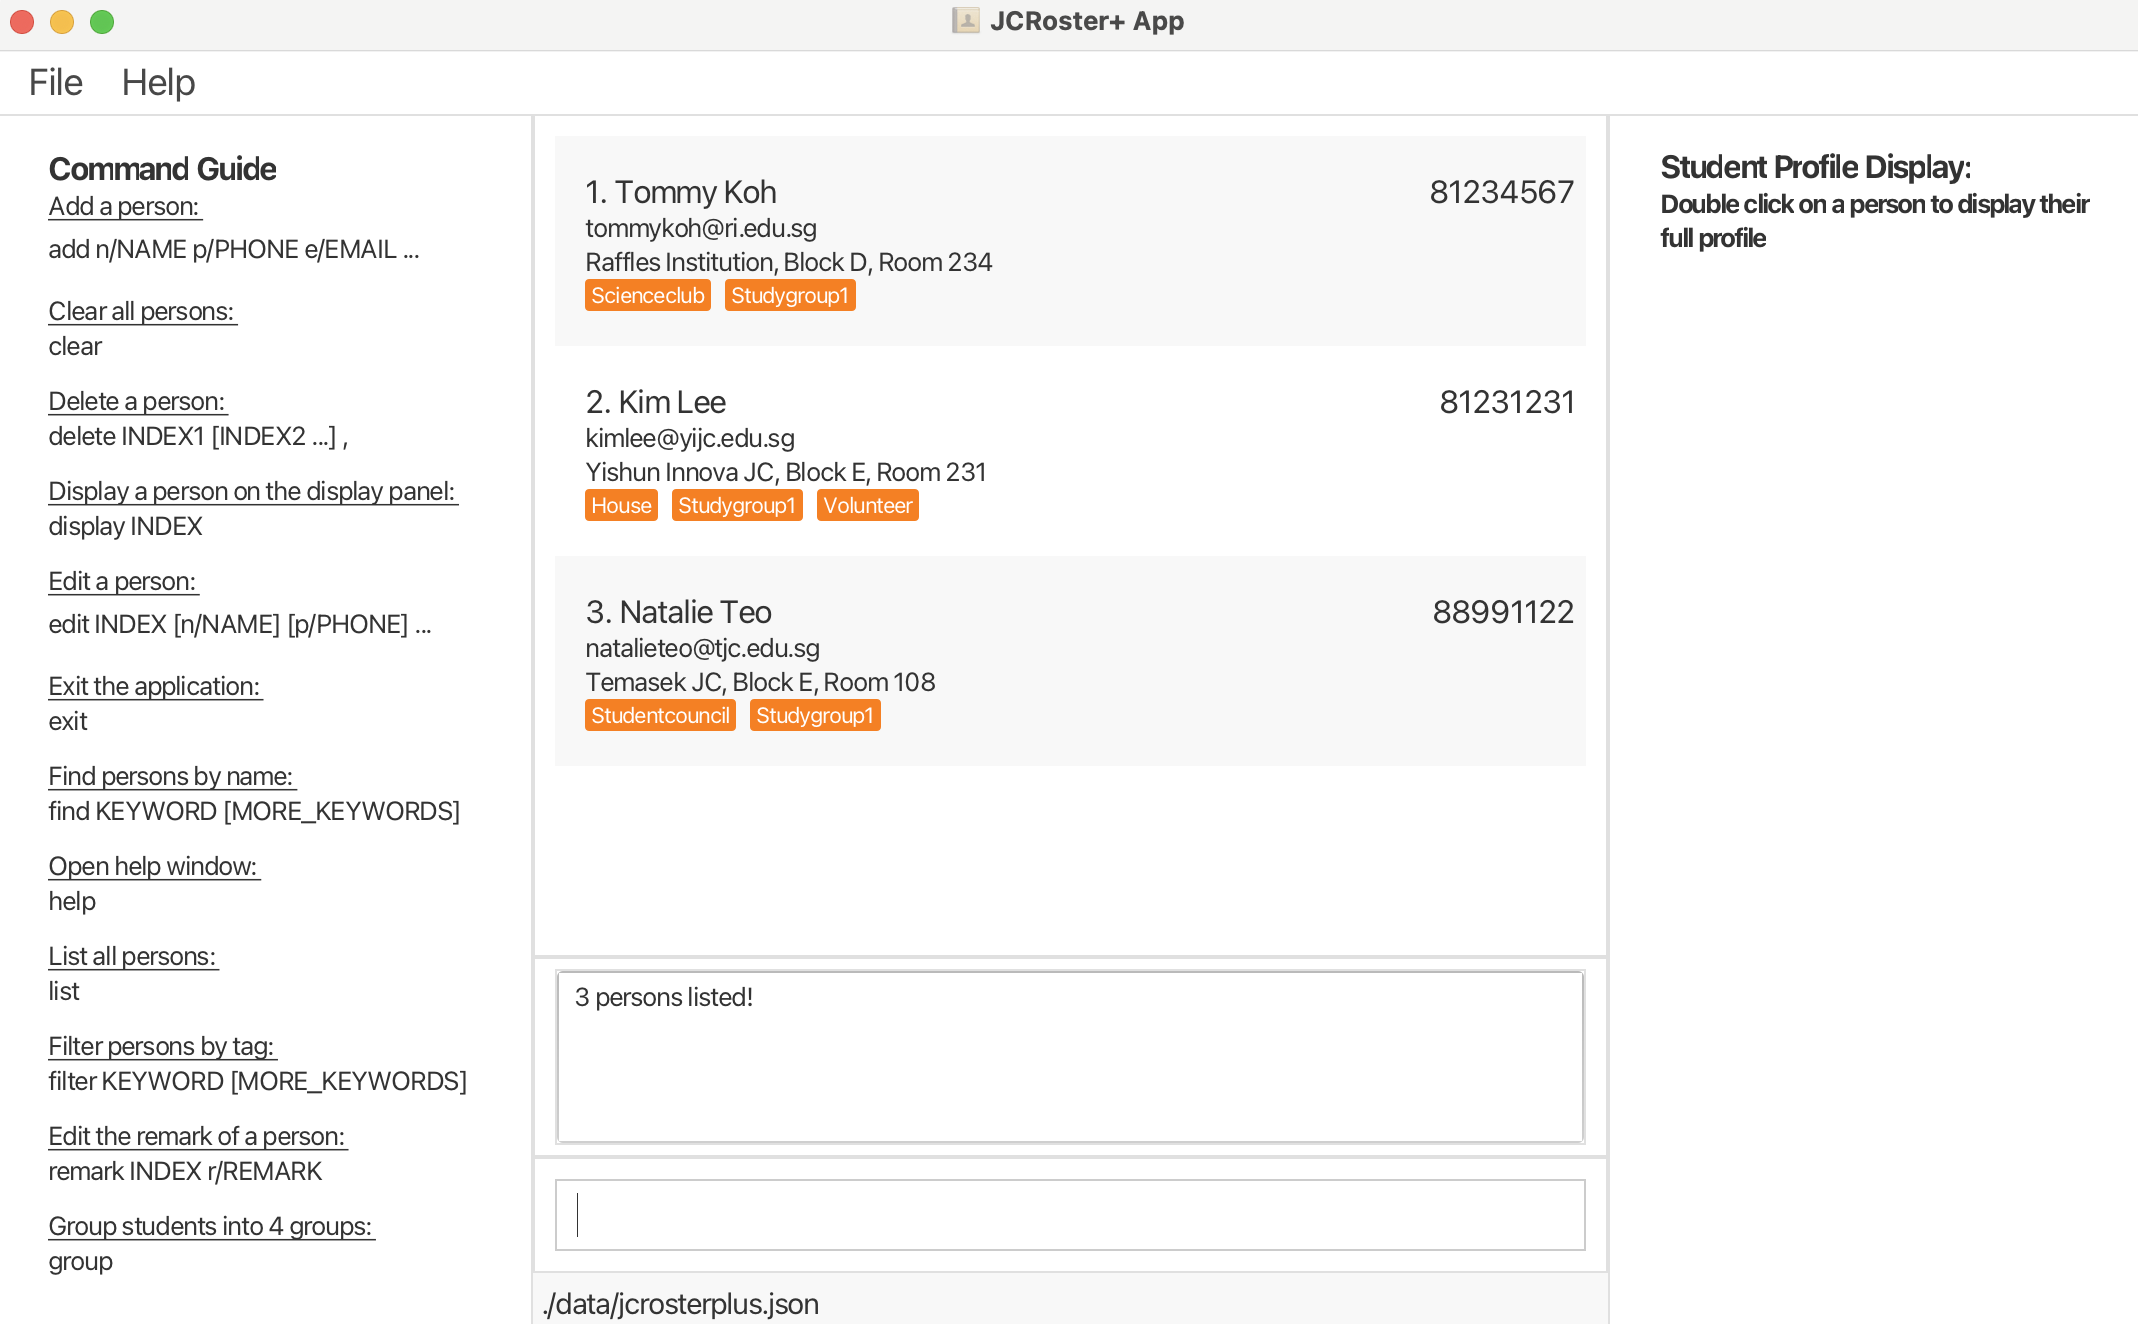
Advanced Tag-Based Filtering : filter
Users can filter students based on multiple tags. Tags include study groups, and any other unique tags that have been added to students.
Format: filter KEYWORD [MORE KEYWORDS]
Examples:
filter studentfilters all students withstudenttag.filter Studygroup1filters all students withStudyGroup1tag.- The search is case-insensitive. e.g
studygroup1will matchStudygroup1 - Non-full words will still be matched e.g.
friendwill matchfriends - Students with a tag matching at least one keyword will be returned. e.g.
filter student scienceclubwill return all students with eitherstudentorscienceclubtags.
Tip: Quickly find the students of a specific study group by using filter studygroup# where '#' is a number from 1 to 4.
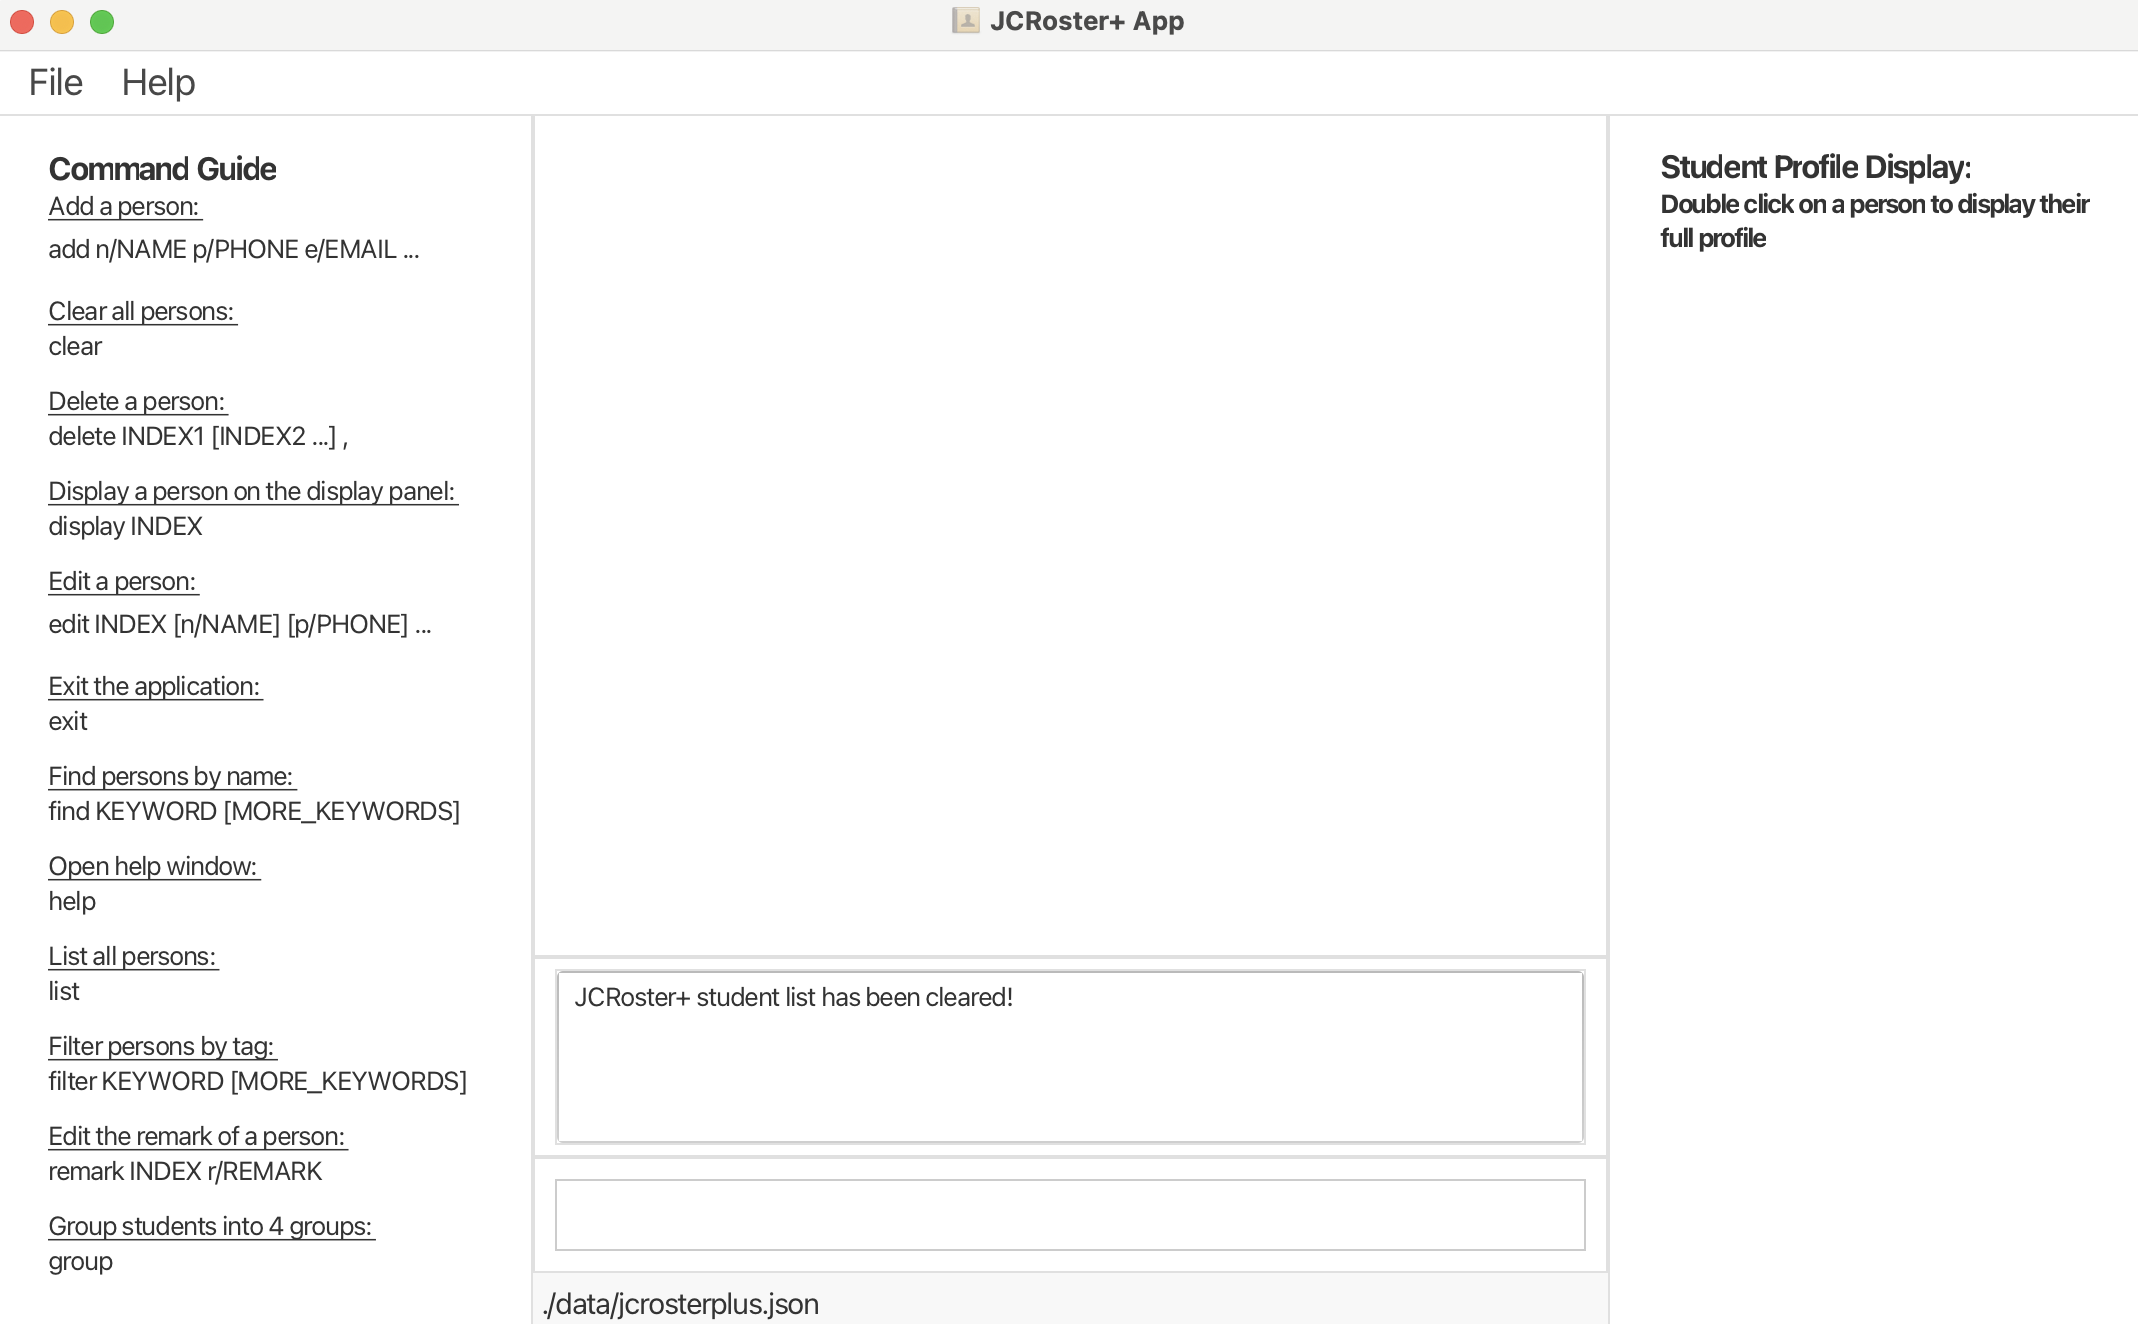
Clearing All Entries : clear
Clears all students entries from the JCRoster+ app.
Note: Use with caution, as this action is irreversible!
Format: clear
Exiting The Program : exit
Exits the program.
Format: exit
Saving Data
JCRoster+ data are saved in the hard disk automatically after any command that changes the data. There is no need to save manually.
Editing the data file
JCRoster+ data are saved automatically as a JSON file [JAR file location]/data/jcrosterplus.json. Advanced users are welcome to update data directly by editing that data file.
Caution:
If your changes to the data file makes its format invalid, JCRoster+ will discard all data and start with an empty data file at the next run. Hence, it is recommended to take a backup of the file before editing it.
Furthermore, certain edits can cause the JCRoster+ to behave in unexpected ways (e.g., if a value entered is outside the acceptable range). Therefore, edit the data file only if you are confident that you can update it correctly.
FAQ
Q: How do I transfer my data to another Computer?
A: Install the app in the other computer and overwrite the empty data file it creates with the file that contains the data of your previous JCRoster+ home folder.
Known issues
- When using multiple screens, if you move the application to a secondary screen, and later switch to using only the primary screen, the GUI will open off-screen. The remedy is to delete the
preferences.jsonfile created by the application before running the application again. - If you minimize the Help Window and then run the
helpcommand (or use theHelpmenu, or the keyboard shortcutF1) again, the original Help Window will remain minimized, and no new Help Window will appear. The remedy is to manually restore the minimized Help Window.
Command summary
| Action | Format, Examples |
|---|---|
| Add | add n/NAME p/PHONE_NUMBER e/EMAIL a/ADDRESS g/SUBJECT1:GRADE, ...SUBJECT6:GRADE [t/TAG]… e.g., add n/James Ho p/22224444 e/jamesho@example.com a/123, Clementi Rd, 1234665 g/Maths:A, Geography:B, History:B, Economics:A, Chemistry:C, Biology:A t/Famliy |
| Clear | clear |
| Delete | delete INDEX1 INDEX2...e.g., delete 2 3 |
| Edit | edit INDEX [n/NAME] [p/PHONE_NUMBER] [e/EMAIL] [a/ADDRESS] [g/SUBJECT1:GRADE, ...SUBJECT6:GRADE] [t/TAG]…e.g., edit 2 n/James Lee e/jameslee@example.com |
| Find | find KEYWORD [MORE_KEYWORDS]e.g., find James Jake |
| List | list |
| Help | help |
| Exit | exit |
| Filter | filter KEYWORD [MORE_KEYWORDS]e.g., filter student tutor |
| Remark | remark INDEX r/REMARKe.g., remark 2 r/Completed project |
| Group | group |
| Display | display INDEXe.g., display 2 |
Tech support
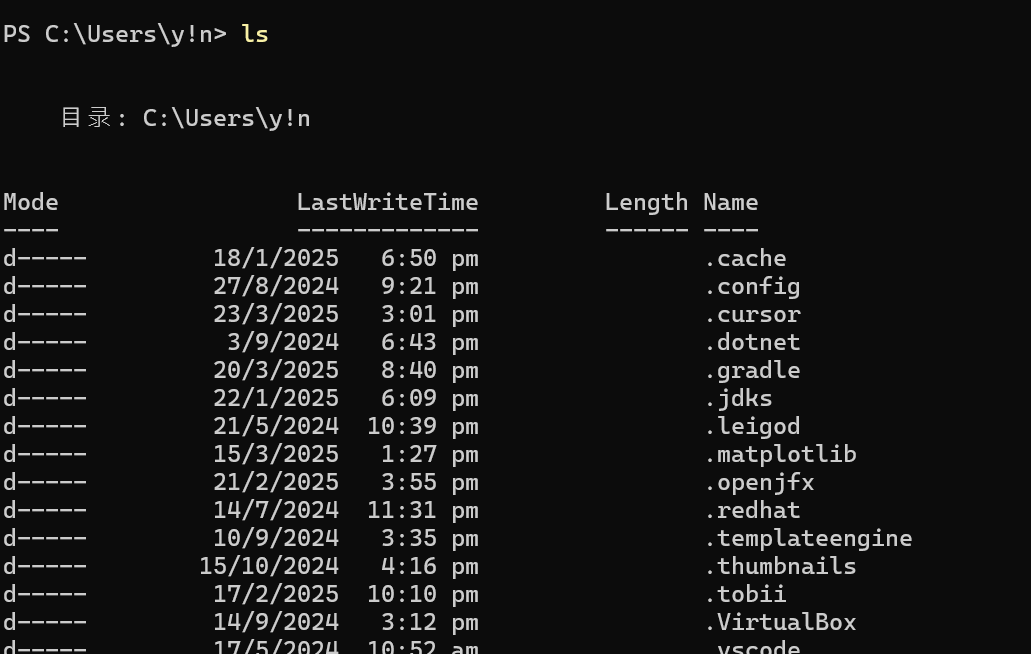
Using cd command
After opening terminal, you will see a screen like this:

Type ls to see files in the current directory
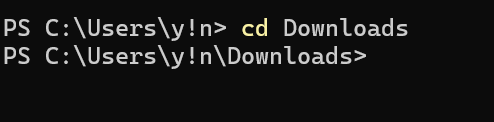
Type cd [folder name] to enter that folder
For example: After cd Downloads The terminal should now show you that you’re inside the Downloads folder
Type cd .. to go back to the previous folder
If you dont know the path to your JAR file
- Find your JAR file and right click on it.
- After clicking on properties, locate the path to the file.
- Copy the path and use it in the terminal
cd [path-to-file]to navigate to the folder where the JAR file is located.